1. Introduction
Yoga, an ancient holistic practice, integrates postures (asanas), breathing techniques (pranayama), and meditation to promote physical, mental, and spiritual well-being. Among asanas, Shalabhasana (Locust Pose) is a prone back-strengthening posture that focuses on improving spinal extension, posterior chain strength, core stability, and body awareness.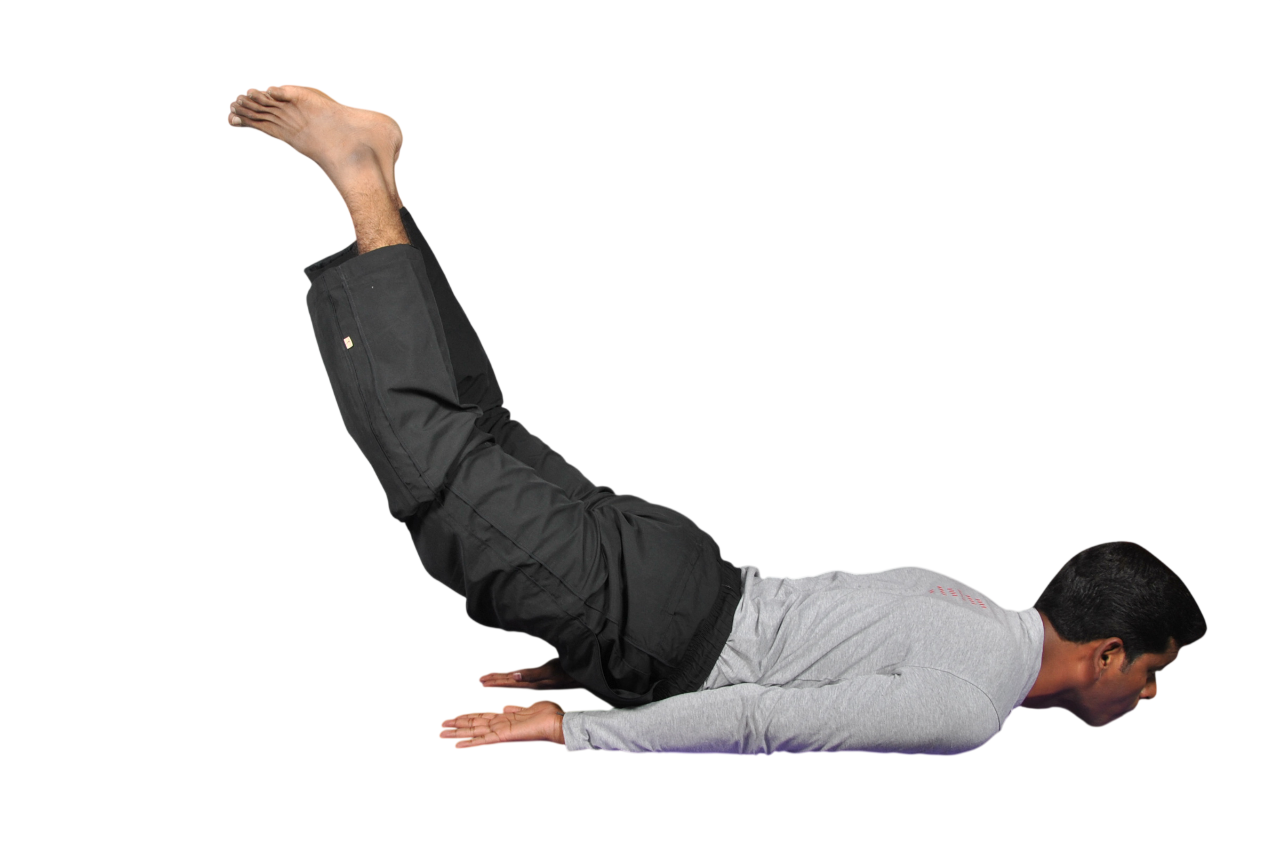
Shalabhasana is considered a dynamic asana that strengthens the back muscles, gluteals, hamstrings, and shoulders. It is often recommended in yoga therapy for postural correction, alleviating mild spinal issues, and as a preparatory posture for deeper backbends and inversions. Regular practice enhances overall body coordination, muscular endurance, and energy flow along the posterior kinetic chain.
2. Word Meaning and Definition
Word Meaning:
- Shalabha: Locust
- Asana: Posture or Pose
Definition:
Shalabhasana is a prone posture in which the practitioner lies on the abdomen and simultaneously lifts both legs off the ground while keeping the torso grounded. Arms may remain alongside the body or extend backward in advanced variations. The pose activates the posterior muscles of the spine, glutes, and legs, promoting spinal extension and postural alignment.
Sanskrit Interpretation:
Shalabha, meaning locust, reflects the way the body extends and elevates like a locust in mid-flight. The asana emphasizes spinal elongation, lower back strength, and posterior chain activation.
3. Method of Practice – Step by Step
Step 1: Initial Position
- Lie prone on a comfortable yoga mat.
- Legs extended backward, toes pointing back.
- Arms resting alongside the body, palms facing downward.
- Forehead resting lightly on the mat to keep the cervical spine neutral.
Step 2: Arm Positioning
- Beginners: Keep arms alongside the body, palms pressing gently on the floor.
- Intermediate/Advanced: Arms can be extended backward alongside the torso, fingers pointing toward the heels.
Step 3: Leg Lift
- Inhale deeply and engage glutes, hamstrings, and spinal erectors.
- Lift both legs simultaneously a few inches off the floor.
- Ensure thighs, knees, and feet are lifted together, creating a straight line from hips to toes.
Step 4: Torso Engagement
- Keep the pelvis grounded.
- Avoid arching excessively in the lower back.
- Engage abdominal muscles lightly to stabilize the spine.
Step 5: Holding the Pose
- Maintain the lift for 10–30 seconds initially, depending on experience.
- Keep gaze forward or slightly downward to avoid neck strain.
- Maintain slow, deep diaphragmatic breathing.
Step 6: Lowering the Legs
- Exhale slowly and lower legs to the mat in a controlled manner.
- Relax the body for a few breaths.
- Repeat 2–5 rounds, gradually increasing duration and lift height with regular practice.
4. Alignment Cues
- Head and Neck: Keep cervical spine neutral; gaze slightly forward or down.
- Shoulders: Draw shoulder blades gently together; avoid lifting toward ears.
- Spine: Maintain natural spinal curves; avoid hyperextension.
- Pelvis: Grounded and stable; avoid rocking side to side.
- Legs: Extended and lifted together; toes pointed.
- Breathing: Inhale to lift, exhale to lower; maintain slow, rhythmic breath.
5. Benefits of Shalabhasana
- Spinal Strength and Stability:
- Strengthens erector spinae, multifidus, and spinal stabilizers.
- Promotes postural correction and reduces slouching.
- Posterior Chain Development:
- Engages gluteus maximus, hamstrings, and calves for coordinated strength.
- Core Engagement:
- Activates rectus abdominis and obliques to stabilize pelvis and spine.
- Shoulder and Upper Back Activation:
- Engages posterior deltoids, rhomboids, and trapezius for scapular stability.
- Improved Energy Flow:
- Stimulates energy along the spine and back body, enhancing circulation.
- Therapeutic Benefits:
- Relieves mild lumbar discomfort, strengthens back muscles for everyday postural support.
- Mental Focus and Awareness:
- Enhances proprioception and body-mind coordination.
- Encourages focus on controlled movements and mindful breathing.
6. Contraindications
- Acute or chronic spinal injury
- Herniated discs
- Severe lower back pain
- Pregnancy (especially advanced stages)
- Recent abdominal or thoracic surgery
- Hip or knee joint issues that prevent leg lifting
7. Counterposes
- Balasana (Child’s Pose): Gently stretches the back, relieves lower back tension.
- Adho Mukha Svanasana (Downward-Facing Dog): Lengthens posterior chain muscles.
- Supta Baddha Konasana (Reclined Bound Angle Pose): Restores pelvic and lumbar alignment.
- Ardha Shalabhasana (Half Locust Pose): Can be performed as a preparatory relaxation counterpose for beginners.
8. Preparatory Practice
- Bhujangasana (Cobra Pose): Opens thoracic spine and strengthens erector spinae.
- Ardha Shalabhasana (Half Locust Pose): Prepares posterior chain muscles.
- Setu Bandhasana (Bridge Pose): Strengthens glutes and stabilizes lower back.
- Cat-Cow Stretch: Mobilizes thoracic and lumbar spine.
- Hip Flexor Stretches: Reduces tension in anterior hip for easier leg lift.
9. Modifications
- Beginner Lift: Raise legs one at a time to develop strength.
- Knee Bend Variation: Slightly bend knees to reduce hamstring tension.
- Pelvic Support: Place a folded blanket under pelvis to reduce lumbar strain.
- Partial Lift: Raise legs only a few inches initially; increase gradually.
- Arm Support: Keep arms under shoulders or alongside the body to ease shoulder strain.
10. Muscles Involved
Primary Muscles Engaged:
- Erector Spinae (spinal extension)
- Gluteus Maximus (hip extension)
- Hamstrings (hip extension)
- Posterior Deltoids (shoulder stabilization)
Secondary Muscles:
- Rectus Abdominis and Obliques (core stabilization)
- Quadratus Lumborum (pelvic stabilization)
- Latissimus Dorsi (upper back support)
- Gastrocnemius (posterior leg stabilization)
11. Kinesiology and Kinematics
- Joint Movements:
- Spine: Lumbar and thoracic extension
- Hip: Extension of lifted legs
- Shoulder: Scapular stabilization
- Knee: Extension
- Ankle: Plantarflexion
- Movement Planes:
- Sagittal plane: Spine and hip extension (primary)
- Frontal plane: Minimal pelvic stabilization
- Transverse plane: Minimal rotation
- Type of Muscle Action:
- Concentric: Glutes and spinal extensors during lift
- Eccentric: Controlling descent of legs
- Isometric: Core and scapular stabilizers
12. Biomechanics and Functional Anatomy
- Spinal Mechanics:
- Strengthens posterior spinal muscles without compressing intervertebral discs.
- Improves lumbar and thoracic extension endurance.
- Hip Mechanics:
- Engages hip extensors, enhances posterior chain strength, and improves gait mechanics.
- Muscle Coordination:
- Synchronizes core, back, and leg muscles for smooth leg lifts.
- Physiological Effects:
- Improves circulation to back and leg muscles.
- Reduces stiffness in thoracic and lumbar spine.
- Enhances proprioception and neuromuscular control.
13. Functional Anatomy & Physiology
- Spine: Strengthens erector spinae, multifidus, and stabilizers.
- Muscular System: Activates gluteals, hamstrings, and posterior deltoids.
- Nervous System: Improves proprioception and body awareness.
- Circulatory System: Enhances venous return and circulation along posterior chain.
- Respiratory System: Promotes diaphragmatic engagement through core stabilization.
- Joint Health: Maintains spinal, hip, and knee mobility.
14. How to Correct and Adjust While Teaching
- Pelvis: Ensure it remains grounded; avoid rocking side to side.
- Spine: Maintain neutral spinal curve; avoid hyperextension.
- Shoulders: Relaxed and scapula gently retracted.
- Neck: Avoid craning; forehead slightly forward.
- Leg Lift: Adjust height according to strength; avoid over-lifting.
- Core Engagement: Cue transverse abdominis and obliques to stabilize spine.
- Breathing: Slow, controlled inhalation during lift, exhalation during lowering.
- Props: Use folded blanket under pelvis for beginners if needed.
- Gradual Progression: Start with short hold times, gradually increasing.
15. Tips for Teaching Shalabhasana
- Demonstrate proper leg lift technique first.
- Emphasize pelvic grounding and core engagement.
- Observe alignment of spine, shoulders, and pelvis.
- Use tactile cues to guide safe lift and leg descent.
- Integrate as a preparatory pose for advanced backbends.
- Encourage focus on breath and body awareness for mind-body integration.
16. Variations and Advanced Practice
- Full Shalabhasana with Arms Extended Backward: Enhances shoulder and upper back engagement.
- Shalabhasana with Alternate Leg and Arm Lift: Improves coordination and balance.
- Shalabhasana with Props: Bolsters or folded blankets under pelvis for beginners or rehabilitation.
17. Conclusion
Shalabhasana is a cornerstone yoga posture for strengthening the posterior chain, improving spinal stability, enhancing posture, and developing body awareness. It provides a combination of muscular strengthening, core stabilization, and mental focus. With proper alignment, preparatory practices, and modifications, Shalabhasana can be safely practiced by beginners and advanced practitioners alike. It serves as a foundational pose for more advanced backbends and is a therapeutic tool for mild spinal issues and postural correction.
QUESTIONS AND ANSWERS
- The literal meaning of Shalabhasana is:
a) Locust Pose ✅
b) Crocodile Pose
c) Half Locust Pose
d) Fish Pose - Primary muscles engaged include:
a) Gluteus Maximus, Hamstrings, Erector Spinae ✅
b) Quadriceps only
c) Pectorals only
d) Deltoids only - Main benefit of Shalabhasana is:
a) Spinal extension and posterior chain strengthening ✅
b) Forward bending
c) Inversion
d) Hip flexion - Contraindication for Shalabhasana:
a) Recent spinal injury ✅
b) Mild fatigue
c) Stress
d) Sedentary lifestyle - Recommended preparatory poses:
a) Bhujangasana, Ardha Shalabhasana, Setu Bandha ✅
b) Tadasana only
c) Headstand only
d) Virabhadrasana only - Recommended counterpose:
a) Balasana ✅
b) Sirsasana
c) Halasana
d) Padmasana - Ideal duration for beginners:
a) 10–30 seconds hold ✅
b) 1–2 minutes
c) 5 minutes only
d) 3–5 seconds - Arm positioning options:
a) Alongside body or backward extension ✅
b) Crossed behind back
c) Fully extended overhead
d) Dangling off mat - Correct breathing cue:
a) Inhale to lift legs, exhale to lower ✅
b) Hold breath throughout
c) Rapid shallow breaths
d) Exhale to lift, inhale to lower - Key alignment cue:
a) Ground pelvis, avoid excessive lower back arch ✅
b) Lift pelvis off mat
c) Rotate hips
d) Overextend spine
Answer Key:
- a
- a
- a
- a
- a
- a
- a
- a
- a
- a
1. Meaning and Definition
- The literal meaning of Shalabhasana is:
a) Crocodile Pose
b) Locust Pose ✅
c) Half Locust Pose
d) Fish Pose - The Sanskrit word “Shalabha” refers to:
a) Snake
b) Locust ✅
c) Crocodile
d) Lotus - Shalabhasana primarily focuses on:
a) Forward bending
b) Spinal extension and posterior chain strengthening ✅
c) Inversion
d) Hip flexion
2. Method of Practice
- The initial position for Shalabhasana is:
a) Sit cross-legged
b) Lie prone on the mat ✅
c) Stand with arms overhead
d) Lie supine - Arm positioning options include:
a) Alongside the body or extended backward ✅
b) Crossed behind back
c) Fully extended overhead
d) Dangling off mat - During the pose, legs should be:
a) Lifted straight together, toes pointing backward ✅
b) Bent at knees only
c) Crossed under hips
d) Lifted one at a time only - Head position should be:
a) Lifted with neck craned
b) Neutral or gaze slightly forward ✅
c) Turned excessively
d) Pressed hard into mat
3. Alignment and Technique
- Shoulder alignment cue is:
a) Lift toward ears
b) Relaxed with scapula slightly retracted ✅
c) Compressed forward
d) Rotate inward - Spine alignment should be:
a) Neutral with slight lumbar curve ✅
b) Over-arched
c) Flattened
d) Twisted - Pelvis should:
a) Rock side to side
b) Remain grounded ✅
c) Lift off mat
d) Tilt backward - Breathing cue during leg lift:
a) Inhale to lift, exhale to lower ✅
b) Hold breath
c) Rapid shallow breaths
d) Exhale to lift, inhale to lower
4. Muscles and Anatomy
- Primary muscles engaged include:
a) Gluteus Maximus, Hamstrings, Erector Spinae ✅
b) Quadriceps only
c) Pectorals only
d) Deltoids only - Secondary muscles involved:
a) Rectus Abdominis, Obliques, Quadratus Lumborum, Latissimus Dorsi ✅
b) Biceps only
c) Gastrocnemius only
d) Soleus only - Which muscle is primarily responsible for spinal extension in Shalabhasana?
a) Rectus Abdominis
b) Erector Spinae ✅
c) Quadriceps
d) Deltoid - Muscles that stabilize the pelvis during leg lift include:
a) Gluteus Medius only
b) Obliques and Quadratus Lumborum ✅
c) Hamstrings only
d) Gastrocnemius only
5. Benefits
- Shalabhasana strengthens:
a) Posterior chain ✅
b) Anterior chain only
c) Arms only
d) Neck only - Other benefits include:
a) Improved posture ✅
b) Increased heart rate
c) Compression of lumbar spine
d) Decreased flexibility - Therapeutic application of Shalabhasana includes:
a) Mild lower back pain relief ✅
b) Cardiovascular endurance
c) High-intensity training
d) Forward bending therapy
6. Contraindications
- Shalabhasana should be avoided in:
a) Recent spinal injury ✅
b) Mild fatigue
c) General stress
d) Sedentary lifestyle - Which condition is also a contraindication?
a) Advanced pregnancy ✅
b) Morning practice
c) Evening relaxation
d) Light stretching - Severe hip or knee problems make Shalabhasana:
a) Safer
b) Contraindicated ✅
c) Optional
d) Beneficial
7. Counterposes and Preparatory Asanas
- Recommended counterpose after Shalabhasana:
a) Balasana (Child’s Pose) ✅
b) Headstand
c) Dhanurasana
d) Padmasana - Preparatory asanas include:
a) Bhujangasana, Ardha Shalabhasana, Setu Bandha ✅
b) Tadasana only
c) Headstand only
d) Virabhadrasana only - Modification for beginners:
a) Lift legs one at a time ✅
b) Full arm extension
c) Jumping leg lifts
d) Simultaneous leg lifts only
8. Teaching and Adjustment
- How to protect the lower back?
a) Engage core and keep pelvis grounded ✅
b) Over-arch spine
c) Rotate pelvis
d) Lift both legs excessively - Cue for leg lift:
a) Lift using hamstrings only
b) Engage glutes, hamstrings, and spinal extensors ✅
c) Lift without core engagement
d) Keep feet flexed - Duration recommendation for beginners:
a) 10–30 seconds hold ✅
b) 1–2 minutes
c) 5 minutes
d) 3–5 seconds - Props can be used for:
a) Pelvic support ✅
b) Increasing difficulty
c) Arm strengthening
d) Neck strain - Arm positioning should focus on:
a) Supporting head or alongside body ✅
b) Crossed behind back
c) Fully extended overhead
d) Dangling off mat - Key alignment cue:
a) Ground pelvis, avoid excessive lower back arch ✅
b) Lift pelvis off mat
c) Rotate hips
d) Overextend spine
Answer Key
- b
- b
- b
- b
- a
- a
- b
- b
- a
- b
- a
- a
- a
- b
- b
- a
- a
- a
- a
- a
- b
- a
- a
- a
- a
- b
- a
- a
- a
- a