1. Introduction
Shavasana (Sanskrit:, also known as Corpse Pose, is one of the most essential and widely practiced postures in yoga. Unlike active asanas, Shavasana focuses on complete relaxation of the body and mind, promoting physical, mental, and emotional restoration.
Shavasana is often performed at the end of a yoga session, functioning as a transition from asana practice to meditative stillness. Though simple in appearance, it requires awareness, breath regulation, and muscular release, making it a highly effective posture for stress reduction, nervous system balance, and mind-body integration.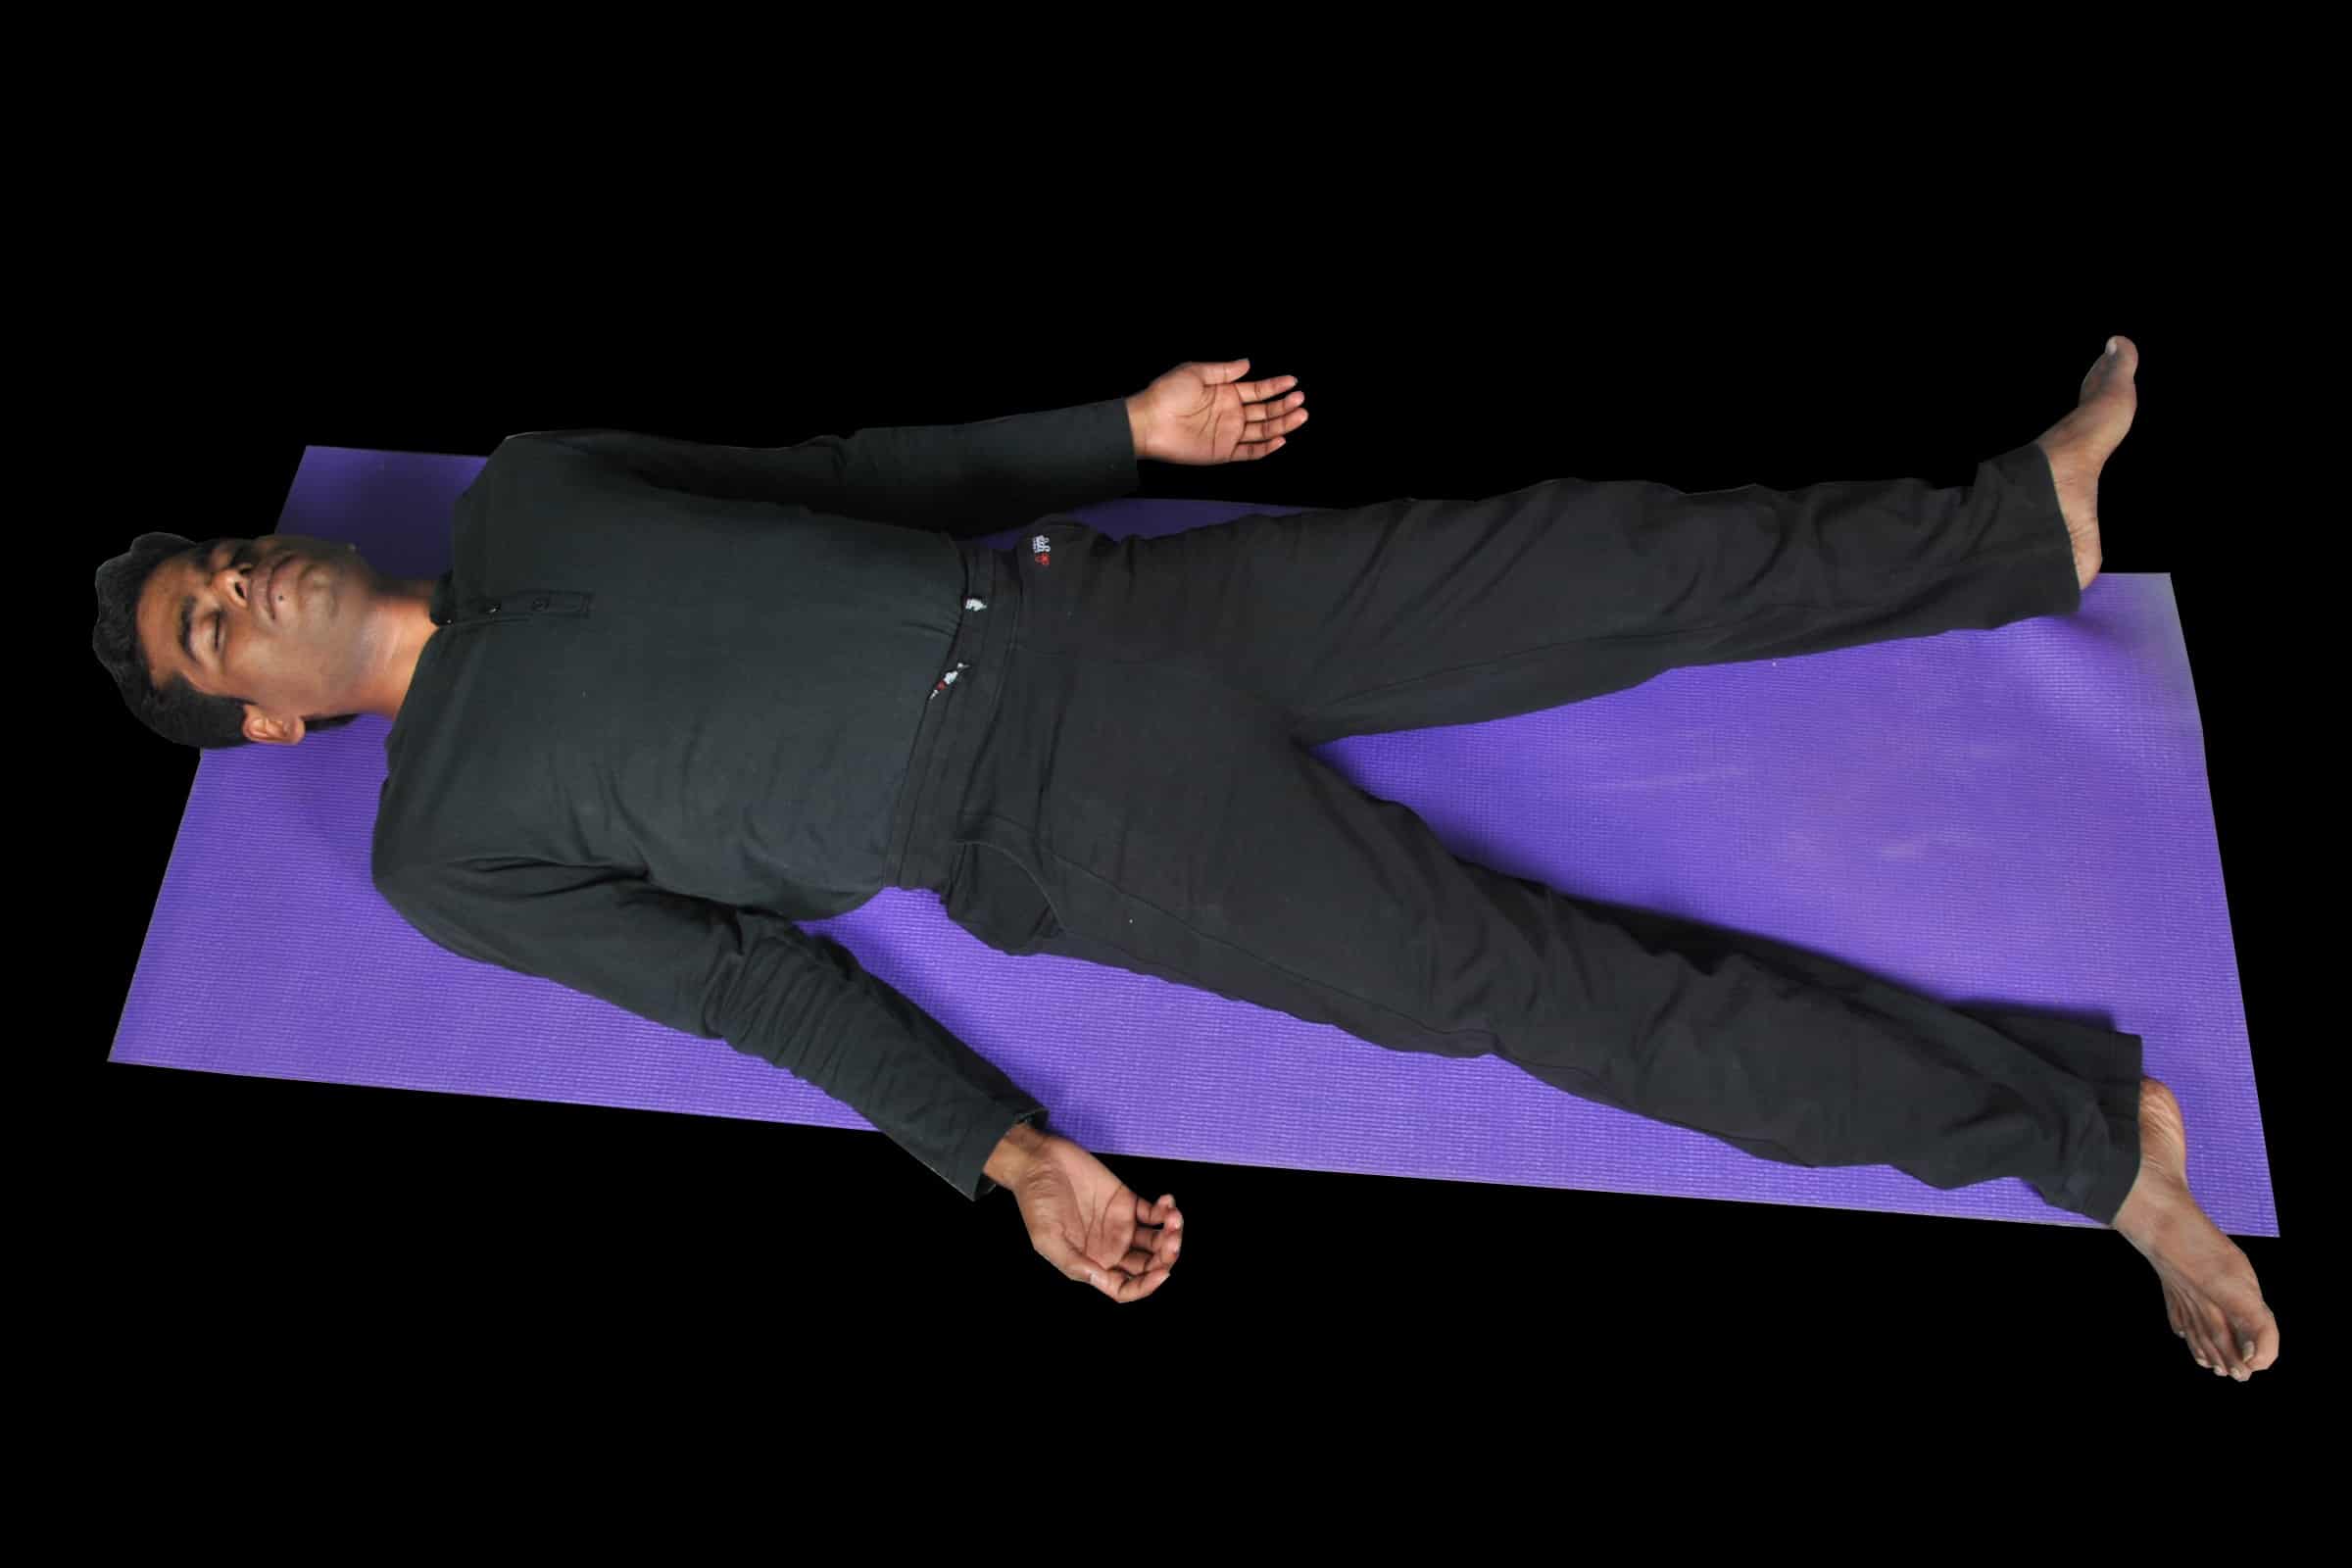
2. Word Meaning and Definition
2.1 Word Meaning
- Shava : Corpse or dead body
- Asana : Posture or seat
Thus, Shavasana translates literally to Corpse Pose, indicating the complete stillness and passive relaxation that the practitioner embodies while lying supine.
2.2 Definition
Shavasana is a supine relaxation posture where the body is completely supported by the floor, muscles are consciously relaxed, the breath is natural, and the mind is allowed to rest while maintaining awareness.
It is a passive asana that integrates body awareness, breath control, and mental stillness, and serves as a bridge between active physical practice and meditative absorption (dhyana).
3. Method of Practice — Step by Step
Step 1: Preparation
- Choose a quiet, well-ventilated space.
- Lie on a flat, firm surface or yoga mat.
- Remove tight clothing, jewelry, or accessories that may restrict movement or breathing.
Step 2: Initial Positioning
- Lie flat on your back.
- Legs slightly apart, with feet naturally falling outward.
- Arms relaxed along the sides, palms facing upward.
- Head aligned with the spine, chin slightly tucked, neck relaxed.
Step 3: Muscular Relaxation
- Consciously relax all muscle groups, starting from toes up to the scalp.
- Focus on releasing tension in shoulders, jaw, neck, and back.
Step 4: Breath Awareness
- Breathe naturally and gently.
- Observe the rise and fall of the abdomen or chest without altering the breath.
- Maintain mindful awareness of breath and bodily sensations.
Step 5: Mental Relaxation
- Release thoughts, judgments, and expectations.
- Allow awareness to rest on the body and breath.
- Practice mindfulness or guided meditation if desired.
Step 6: Duration and Exit
- Hold for 5–20 minutes depending on the session.
- To exit, wiggle fingers and toes, slowly roll to the side in fetal position, and rise to seated position.
- Avoid sudden movement to prevent dizziness or strain.
4. Alignment Cues
- Legs: Hip-width apart or slightly wider, toes naturally falling outward.
- Arms: Slightly away from the body, palms facing upward for energy openness.
- Spine: Neutral, maintaining natural curvature.
- Head and Neck: Straight alignment, chin gently tucked.
- Jaw and Facial Muscles: Soft and relaxed.
- Breath: Natural and unforced.
5. Benefits
5.1 Physical Benefits
- Muscle relaxation: Releases tension in shoulders, neck, and back.
- Reduces fatigue: Promotes physical restoration after asana practice.
- Improves circulation: Blood flow returns efficiently to all organs.
- Enhances digestion: Relaxed parasympathetic activation aids metabolism.
5.2 Physiological Benefits
- Lowers heart rate and blood pressure.
- Improves oxygen uptake and respiratory efficiency.
- Activates parasympathetic nervous system, reducing stress hormones.
5.3 Psychological Benefits
- Reduces mental stress and anxiety.
- Promotes emotional stability and mindfulness.
- Enhances concentration and mental clarity.
6. Contraindications
- Severe back injury or spinal issues (modify with bolster under knees).
- Pregnancy (support under knees or side-lying modifications).
- Sleep disorders — may induce sleepiness instead of relaxation; practice under guidance.
- Acute injuries or fractures — consult medical guidance.
7. Counterposes
- No formal counterpose is required.
- Gentle spinal stretches (e.g., Supine Knees-to-Chest, Supta Baddha Konasana) may follow.
- Seated meditation after Shavasana ensures smooth transition to upright posture.
8. Preparatory Practices
- Balasana (Child’s Pose) — preps spine and shoulders for relaxation.
- Savasana variations — knees bent, supported with bolster for spinal release.
- Pranayama — calm breathing practices (Anulom Vilom, Nadi Shodhana) enhance relaxation.
- Gentle forward folds (Paschimottanasana) — relax hamstrings and spine.
9. Modifications
- Bolster under knees: Reduces lower back strain.
- Blanket under head: Supports cervical spine.
- Bolster or rolled blanket under spine: Enhances gentle chest opening.
- Side-lying Shavasana: Alternative for pregnancy or spinal issues.
- Eye pillow or soft cloth over eyes: Enhances mental relaxation.
10. Muscles Involved
Although passive, Shavasana involves muscle relaxation awareness:
- Spinal stabilizers: Erector spinae, multifidus — maintained in neutral spine.
- Core muscles: Rectus abdominis, obliques — relaxed but gently supported by floor.
- Neck muscles: Sternocleidomastoid, trapezius — relaxed with alignment.
- Lower limb muscles: Quadriceps, hamstrings, calves — released.
- Shoulder girdle: Deltoids, rhomboids — relaxed with arms at sides.
- Facial muscles: Masseter, frontalis, orbicularis oculi — consciously softened.
11. Kinesiology
- Spine: Neutral alignment; natural lordotic and kyphotic curves maintained.
- Joints: Hips, knees, shoulders in neutral, supported position.
- Muscle action: Passive, focus on eccentric relaxation rather than contraction.
- Breath: Diaphragmatic respiration supports thoracic and abdominal expansion.
12. Kinematics
- Linear relaxation: Entire body lengthened against gravity.
- Symmetry: Even weight distribution between left and right sides.
- Joint angles: Hips extended, knees slightly externally rotated if modified, shoulders abducted slightly.
- Center of gravity: Stable; body supported fully on mat.
13. Biomechanism
- Load distribution: Body weight spread evenly across spine, shoulders, arms, and back.
- Spinal decompression: Floor support allows vertebrae to release tension.
- Diaphragmatic efficiency: Gravity facilitates natural abdominal breathing.
- Neural relaxation: Parasympathetic activation decreases cortisol and sympathetic overactivity.
14. Functional Anatomy & Physiology
- Spinal alignment: Preserves natural curves; reduces disc compression.
- Respiratory system: Encourages deep diaphragmatic breathing.
- Circulatory system: Venous return is enhanced; oxygen delivery improved.
- Nervous system: Parasympathetic dominance promotes calmness and recovery.
- Musculoskeletal system: Muscles are lengthened passively, aiding fascia release.
- Psychophysiological integration: Mind-body connection strengthens awareness, mindfulness, and restorative adaptation.
15. How to Correct and Adjust While Teaching
15.1 Leg and Hip Alignment
- Encourage natural leg separation, allowing toes to relax outward.
- Support knees with blankets for tight hips or lower back strain.
15.2 Arm and Shoulder Placement
- Palms facing up to open chest and shoulders.
- Slight separation from body prevents shoulder tension.
15.3 Spine and Head
- Ensure cervical spine is neutral.
- Use small folded towel under head if neck flexion occurs.
15.4 Breath Awareness
- Cue slow, deep breathing.
- Encourage mindfulness of inhalation and exhalation.
15.5 Mental Guidance
- Guide students to release thoughts gently.
- Offer gentle verbal cues to scan the body from toes to head.
15.6 Duration
- Beginners: 3–5 minutes
- Intermediate: 5–10 minutes
- Advanced: 15–20 minutes
16. Conclusion
Shavasana is a cornerstone of yoga practice, integrating physical relaxation, mental clarity, and emotional balance. While simple in appearance, it is a powerful restorative posture that consolidates the benefits of the entire yoga session.
It is essential to teach, adjust, and practice Shavasana mindfully, respecting individual differences in flexibility, spinal health, and relaxation capacity. Its benefits extend beyond the mat, improving stress resilience, focus, and overall well-being.
QUESTION AND ANSWER
1. Shavasana is commonly known as
A. Corpse Pose
B. Bow Pose
C. Lotus Pose
D. Mountain Pose
Answer: A
2. The Sanskrit word “Shava” means:
A. Life
B. Corpse or dead body
C. Breath
D. Mind
Answer: B
3. What is the main purpose of Shavasana?
A. Strengthen arms and legs
B. Complete physical and mental relaxation
C. Deep backbend
D. Hip flexibility
Answer: B
4. Shavasana is usually performed:
A. At the beginning of practice
B. During pranayama only
C. At the end of a yoga session
D. While standing
Answer: C
5. The ideal arm position in Shavasana is:
A. Along the sides with palms facing up
B. Crossed over the chest
C. Behind the head
D. Clasped together
Answer: A
6. The ideal leg position in Shavasana is:
A. Straight and slightly apart, toes naturally falling outward
B. Crossed in Lotus
C. Bent at knees
D. Standing on toes
Answer: A
7. Which system is primarily activated during Shavasana?
A. Sympathetic nervous system
B. Parasympathetic nervous system
C. Digestive system only
D. Skeletal system
Answer: B
8. Which of the following is a contraindication for Shavasana?
A. Severe back injury
B. Pregnancy without modifications
C. Acute spinal issues
D. All of the above
Answer: D
9. Which preparatory pose can help with Shavasana?
A. Balasana (Child’s Pose)
B. Uttanasana (Standing Forward Bend)
C. Paschimottanasana (Seated Forward Bend)
D. All of the above
Answer: D
10. Which modification can be used for lower back discomfort in Shavasana?
A. Bolster or blanket under knees
B. Block under head only
C. Keep knees extended tightly
D. Fold arms behind head
Answer: A
11. The head in Shavasana should be:
A. Tilted backward
B. Neutral and aligned with the spine
C. Turned sideways
D. Raised with a block only
Answer: B
12. Breath in Shavasana should be:
A. Natural and unforced
B. Rapid and shallow
C. Held for long periods
D. Hyperventilated
Answer: A
13. Which muscle groups are consciously relaxed in Shavasana?
A. Neck, shoulders, back, legs, face
B. Only arms
C. Only spine
D. Only legs
Answer: A
14. Shavasana primarily benefits:
A. Muscular strength
B. Stress reduction and mental relaxation
C. High-intensity cardio
D. Weightlifting performance
Answer: B
15. Which of the following is true about Shavasana?
A. It is an active posture
B. It requires full muscle engagement
C. It is a passive restorative posture
D. It is a standing posture
Answer: C
16. Which of the following is a suitable duration for beginners in Shavasana?
A. 30–60 minutes
B. 3–5 minutes
C. 1–2 hours
D. 30 seconds
Answer: B
17. Shavasana helps improve which of the following mental aspects?
A. Mindfulness
B. Concentration
C. Emotional stability
D. All of the above
Answer: D
18. A helpful prop under the head in Shavasana:
A. Blanket
B. Wooden block
C. Chair
D. No prop
Answer: A
19. Shavasana can improve which physiological function?
A. Heart rate reduction
B. Blood pressure regulation
C. Parasympathetic dominance
D. All of the above
Answer: D
20. Which variation of Shavasana is recommended during pregnancy?
A. Side-lying with bolster
B. Full supine
C. Lotus with arms overhead
D. Headstand
Answer: A
21. Which of the following should a teacher cue during Shavasana?
A. Scan body from toes to head
B. Focus on breath
C. Release tension consciously
D. All of the above
Answer: D
22. Which joint positions are neutral in Shavasana?
A. Hips, knees, shoulders
B. Only elbows
C. Only ankles
D. Only neck
Answer: A
23. Shavasana is beneficial for:
A. Nervous system recovery
B. Muscular relaxation
C. Emotional regulation
D. All of the above
Answer: D
24. The main biomechanical principle of Shavasana is:
A. Weight-bearing through arms
B. Passive release of tension and even load distribution
C. Dynamic spinal flexion
D. Hip extension against resistance
Answer: B
25. To exit Shavasana safely, a practitioner should:
A. Slowly wiggle fingers and toes, roll to side, then sit
B. Jump to standing immediately
C. Sit upright without rolling
D. Hold breath while rising
Answer: A