
Nauli Kriya: How to Do, Precautions & Benefits

Nauli Kriya: How to Do, Precautions & Benefits What is Nauli Kriya? Nauli Kriya is an advanced yogic cleansing technique (Shatkarma) that involves massaging the abdominal organs by isolating and rotating the abdominal muscles. It is one of the most powerful practices for detoxifying the digestive system and stimulating the solar plexus (Manipura Chakra). This kriya is best practiced on an empty stomach and is known to enhance digestion, metabolism, and overall vitality. 📖 Ancient Reference: Hatha Yoga Pradipika (2.34)“The Nauli process stimulates the digestive fire, removing all diseases and increasing bodily heat.” How to Perform Nauli Kriya (Step-by-Step Guide) Preparation: ✅ Best Time: Early morning on an empty stomach✅ Position: Stand with feet shoulder-width apart, bend slightly forward✅ Prerequisite: Learn Uddiyana Bandha (Abdominal Lock) first Steps: 1️⃣ Uddiyana Bandha (Preparation Step):✔️ Take a deep inhale and exhale completely✔️ Hold the breath out and draw the abdomen inward (toward the spine)✔️ This creates a vacuum effect in the abdominal cavity 2️⃣ Madhyama Nauli (Central Isolation):✔️ From Uddiyana Bandha, contract the rectus abdominis (central abdominal muscles)✔️ Hold for a few seconds, then release 3️⃣ Vama Nauli (Left Isolation):✔️ Shift the contraction to the left side of the abdomen✔️ Hold briefly and then release 4️⃣ Dakshina Nauli (Right Isolation):✔️ Shift the contraction to the right side of the abdomen✔️ Hold and then release 5️⃣ Nauli Chalan (Full Rotation):✔️ Move the abdominal muscles in a circular motion (left → center → right → center)✔️ Perform this several times, increasing speed gradually 📌 Duration: 5–10 rounds (start slow and increase gradually)📌 Breathing: Always hold breath out while performing Nauli Kriya Benefits of Nauli Kriya 1️⃣ Enhances Digestion & Gut Health ✔️ Stimulates the digestive fire (Agni)✔️ Relieves constipation, bloating, and indigestion 2️⃣ Strengthens Core Muscles ✔️ Activates deep abdominal muscles✔️ Tones the stomach and improves metabolism 3️⃣ Detoxifies Internal Organs ✔️ Flushes out toxins from the intestines and liver✔️ Supports kidney and pancreas function 4️⃣ Balances the Solar Plexus Chakra (Manipura Chakra) ✔️ Boosts confidence, willpower, and self-esteem✔️ Increases energy levels and vitality 5️⃣ Stimulates the Nervous & Endocrine System ✔️ Activates vagus nerve for better stress management✔️ Regulates hormonal balance Precautions & Contraindications ⚠️ Do NOT practice Nauli Kriya if you have:❌ High blood pressure or heart disease❌ Ulcers, hernia, or recent abdominal surgery❌ Pregnancy or menstruation❌ Severe digestive disorders like Crohn’s disease 🔹 Safety Tips:✔️ Always learn from a trained yoga teacher first✔️ Perform slowly and gently—do not strain✔️ Practice on an empty stomach for best results Final Thoughts Nauli Kriya is a powerful detox and energy-boosting technique that cleanses the digestive system, strengthens core muscles, and enhances vitality. However, it requires proper guidance and gradual practice to master.
Yoga for Diabetes – Can Yoga Help Control & Cure Diabetes?
Yoga for Diabetes – Can Yoga Help Control & Cure Diabetes? Diabetes is a chronic condition that affects blood sugar levels and insulin function. While yoga cannot “cure” diabetes, it can help control blood sugar, improve insulin sensitivity, and reduce stress, making it a valuable part of diabetes management. 🔬 How Yoga Helps with Diabetes 1. Lowers Blood Sugar Levels ✔ Gentle movement and deep breathing help regulate glucose metabolism.✔ Studies show yoga can lower fasting blood sugar and HbA1c levels. 2. Improves Insulin Sensitivity ✔ Helps the body use insulin more efficiently, reducing insulin resistance.✔ Especially beneficial for people with Type 2 diabetes and prediabetes. 3. Reduces Stress & Cortisol Levels ✔ High stress triggers the release of cortisol, which raises blood sugar.✔ Yoga activates the parasympathetic nervous system, promoting relaxation. 4. Supports Weight Management ✔ Helps reduce visceral fat, which is linked to insulin resistance.✔ Encourages mindful eating and healthy lifestyle habits. 5. Improves Circulation & Prevents Complications ✔ Increases blood flow to extremities, reducing the risk of diabetic neuropathy.✔ Supports heart health and lowers blood pressure. 🧘 Best Yoga Poses for Diabetes Management 1. Seated Forward Fold (Paschimottanasana) ✅ Stimulates the pancreas and supports insulin production.✅ Improves digestion and metabolism. 2. Cobra Pose (Bhujangasana) ✅ Stimulates the abdominal organs, including the pancreas.✅ Relieves stress and fatigue. 3. Bow Pose (Dhanurasana) ✅ Strengthens the pancreas and digestive organs.✅ Enhances metabolism and insulin regulation. 4. Legs Up the Wall (Viparita Karani) ✅ Balances blood sugar levels by improving circulation.✅ Promotes relaxation and stress reduction. 5. Supine Spinal Twist (Supta Matsyendrasana) ✅ Stimulates the digestive system and pancreas.✅ Supports detoxification and gut health. 🌬️ Pranayama (Breathing Exercises) for Diabetes 1. Kapalabhati (Skull Shining Breath) ⚡ ✅ Boosts metabolism and pancreatic function.🚫 Avoid if you have high blood pressure or heart issues. 2. Anulom Vilom (Alternate Nostril Breathing) 🌿 ✅ Balances the nervous system and reduces stress-induced sugar spikes.✅ Improves oxygen circulation and mental clarity. 3. Bhramari (Humming Bee Breath) 🎶 ✅ Lowers cortisol and stress levels, preventing sugar imbalances.✅ Promotes deep relaxation and emotional balance. ⚠️ Precautions for Practicing Yoga with Diabetes 🚫 Avoid intense or fast-paced yoga if you have low blood sugar.🚫 Stay hydrated and monitor glucose levels before & after practice.🚫 Use props or modifications if experiencing neuropathy or joint pain.
Kids Yoga for ADHD: Benefits & Best Practices
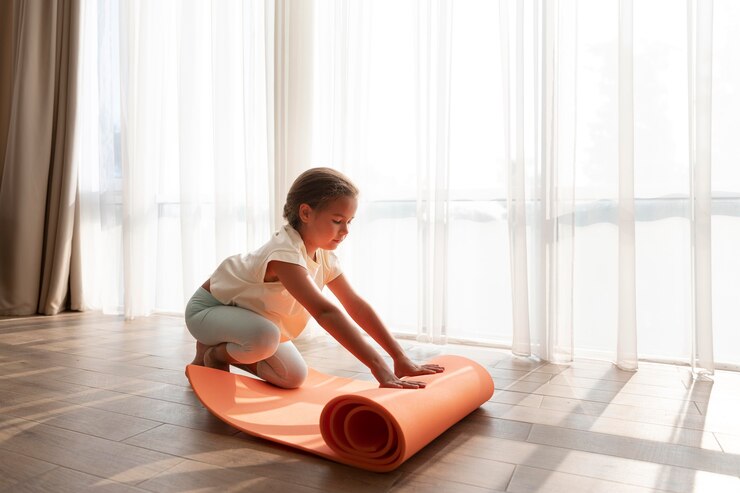
Kids Yoga for ADHD: Benefits & Best Practices Yoga can be an effective, natural tool to help kids with ADHD (Attention Deficit Hyperactivity Disorder) improve focus, self-regulation, and emotional balance. The combination of movement, breathwork, and mindfulness supports their nervous system, helping to reduce hyperactivity, impulsivity, and anxiety. How Yoga Helps Kids with ADHD ✅ Improves Focus & Attention – Mindful breathing and poses encourage concentration.✅ Regulates Energy Levels – Balancing active and calming poses helps manage hyperactivity.✅ Develops Self-Control – Holding poses and practicing stillness enhances impulse control.✅ Reduces Anxiety & Stress – Deep breathing and relaxation techniques calm the nervous system.✅ Enhances Body Awareness – Yoga helps kids recognize and manage their emotions and energy. Best Yoga Practices for ADHD 🧘 1. Start with Breathwork (Pranayama)Simple breathing exercises help calm the mind and prepare the body for movement. Balloon Breath– Inhale deeply, expanding the belly like a balloon; exhale, deflating it. Bumblebee Breath (Bhramari)– Humming while exhaling to soothe the nervous system. Lion’s Breath– Inhale deeply, then exhale with a loud “haaa” and stick out the tongue. 🦸 2. Active Yoga Poses for Energy ReleaseThese poses engage the body and improve focus. Jumping Jacks or Sun Salutations (Surya Namaskar)– Energizing warm-up. Warrior Poses (Virabhadrasana I & II)– Builds strength and focus. Tree Pose (Vrikshasana)– Improves balance and concentration. Frog Pose (Malasana Jumps)– Releases pent-up energy playfully. 🌿 3. Calming & Grounding PosesThese poses help kids transition from activity to relaxation. Child’s Pose (Balasana)– Encourages deep breathing and self-soothing. Butterfly Pose (Baddha Konasana)– Relaxes the body while engaging attention. Legs-Up-The-Wall (Viparita Karani)– Soothes anxiety and promotes relaxation. Cobra Pose (Bhujangasana)– Opens the chest and enhances mood. 🎭 4. Fun & Playful Yoga TechniquesEngage kids by making yoga interactive and imaginative. Storytelling Yoga– Create a story using yoga poses (e.g., jungle adventure, outer space). Animal Poses– Encourage kids to “become” the animals in poses (lion, cat, dog, butterfly). Yoga Games– Try “Freeze Yoga” (hold a pose when the music stops) or “Mirror Yoga” (copy a partner). 🌙 5. End with Relaxation & MeditationHelp kids slow down and integrate their practice. Guided Imagery– Use a calming story (e.g., “floating on a cloud” or “lying in a peaceful garden”). Body Scan Relaxation– Gently guide attention through different body parts. Gratitude Practice– Encourage them to share one happy moment from their day. Creating a Kid-Friendly ADHD Yoga Routine 🔹 Keep sessions short (10-20 minutes).🔹 Use music, storytelling, and props (yoga mats, stuffed animals, or scarves).🔹 Encourage participation, not perfection.🔹 Make it consistent—daily or 3-4 times a week for the best results.
Spine Flexion: A Fundamental Instrument of Well-Being in Yoga
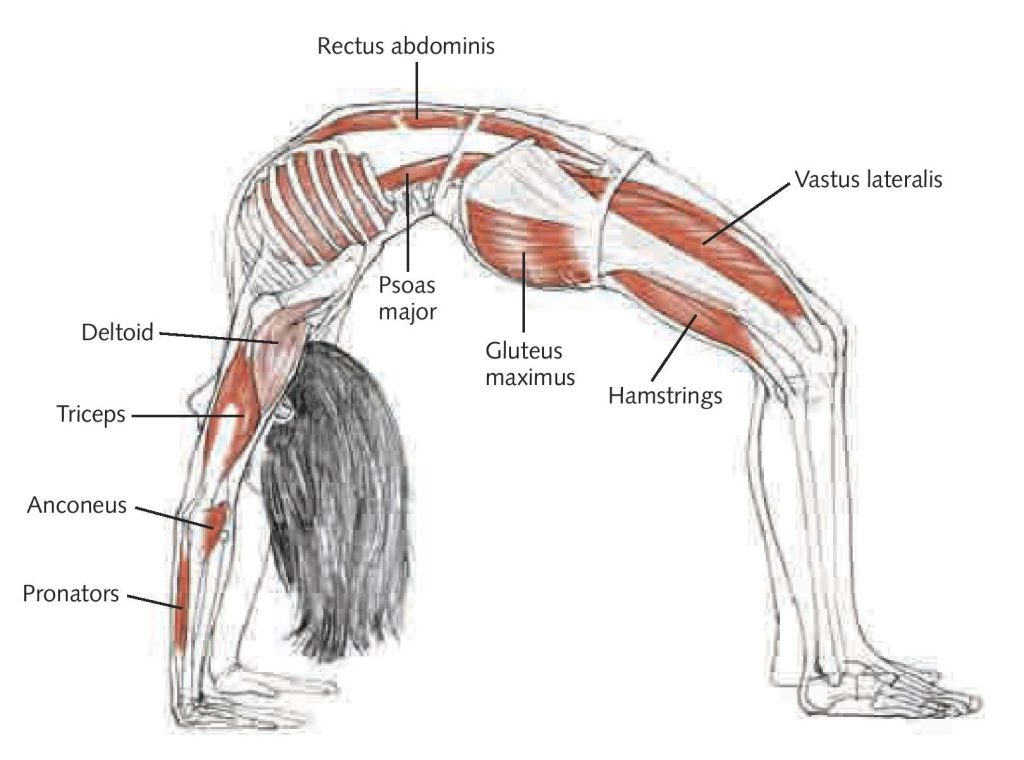
Spine Flexion: A Fundamental Instrument of Well-Being in Yoga Spine flexion refers to the forward bending movement of the spine, where the upper body bends forward towards the thighs, with the spine rounding. It is a common movement in yoga, often seen in forward folds, seated stretches, and various poses. Spine flexion is essential not only for increasing flexibility but also for promoting overall well-being by improving posture, enhancing digestion, relieving tension, and calming the nervous system. Let’s explore why spine flexion is so beneficial in yoga and how it contributes to physical health and mental well-being: 1. Improves Flexibility and Mobility of the Spine Spine flexion helps to stretch the muscles along the back, especially the erector spinae(muscles running along the spine), and the hamstrings, which are key muscles in the posterior chain of the body. Regular practice of spine flexion in yoga improves the mobilityof the spine and helps prevent stiffness and rigidity, especially for people who sit for long periods or have sedentary lifestyles. A more flexible spine also supports better posture and can prevent lower back pain or discomfort caused by tight muscles. 2. Relieves Tension and Stress Flexing the spine, especially in forward bends, promotes muscle relaxationalong the back and neck. By folding forward and releasing tension in the back, yoga helps alleviate the physical manifestations of stress and muscle tightness. The deep forward folding poses(such as Paschimottanasana and Uttanasana) also encourage a release of emotional stress by triggering the body’s parasympathetic nervous system (the “rest and digest” system), which promotes a sense of calm and relaxation. 3. Stimulates the Digestive System Spine flexion compresses and massages the internal organs, particularly in poses that involve deep forward bends. This compression and release action improves the flow of blood and energyto the digestive system, stimulating better digestion and metabolism. Poses like Paschimottanasana, Seated Forward Bend, and Child’s Posehelp with the peristalsis process (the wave-like contractions of the intestines) and improve gut health by activating the vagus nerve, which regulates digestion. 4. Improves Posture Regular spine flexion helps counteract the effects of poor posture, especially the forward head posture and slouching common in people who spend time hunched over computers or phones. It creates balance between the front and back of the body, helping to lengthenthe spine and open up the chest. Spine flexion encourages an alignment where the spine stays elongatedand upright, reducing the tendency to slouch and promoting better posture throughout the day. 5. Enhances Mental Clarity and Calmness The deep, mindful forward bends in yoga encourage a state of meditationand mindfulness, helping clear the mind and calm the thoughts. In forward-folding poses, the act of bowing the head toward the knees or the ground symbolizes an invitation to surrender, relax, and release unnecessary mental clutter. Mindful breathingduring spine flexion poses helps to slow down the heart rate and deepen the breath, facilitating a sense of calm and focus. This can be incredibly useful for managing stress, anxiety, and mental fatigue. 6. Promotes Emotional Health and Letting Go Spine flexionis often linked with emotional release in yoga practice. Forward bending poses are thought to help access and release deep-seated emotions, particularly those associated with the root chakra (Muladhara), which is connected to safety, stability, and grounding. In addition, these poses create space in the body for emotional healing, offering a safe environment to process emotionssuch as grief, sadness, or fear. It’s not uncommon for practitioners to feel an emotional release when performing spine flexion poses in yoga. 7. Stimulates the Central Nervous System The action of folding forward and rounding the spine helps stimulate the central nervous system(CNS), improving its efficiency in processing sensory and motor information. This stimulation helps in balancing the autonomic nervous system, promoting relaxation and reducing the effects of chronic stress. Moreover, activating the vagus nerve through spine flexion supports overall well-being and strengthens the connection between the brain and the body. Common Yoga Poses Involving Spine Flexion: Uttanasana (Standing Forward Bend): A classic forward bend that stretches the entire back and hamstrings, helping to relieve tension and improve flexibility. Focuses on grounding and lengthening the spine, encouraging mental clarity. Paschimottanasana (Seated Forward Bend): A seated forward fold that deepens the stretch along the spine and hamstrings while also offering a calming effect on the mind. It also stimulates the digestive system and reduces lower back pain. Child’s Pose (Balasana): A gentle forward bend that provides rest and helps release tension from the back and neck. Known for its calming effect, it is often used as a restorative pose in yoga practice. Cat-Cow Pose (Marjaryasana-Bitilasana): While Cat pose (spine flexion) is a rounding of the spine, Cow pose (spine extension) provides a gentle way to alternate between flexion and extension. This dynamic movement increases spinal mobility and promotes fluid movement between the vertebrae. Reclining Forward Bend (Supta Paschimottanasana): A variation of Paschimottanasana done lying down. It allows for a deeper stretch while offering support to the lower back. This modification helps release stress and tension while focusing on the breath. Seated Forward Fold with a Twist (Parivrtta Paschimottanasana): A combination of forward folding and twisting that adds a layer of complexity while stretching the spine and stimulating the digestive system. Forward Fold with Block (Setu Bandhasana with Block): A gentle variation of forward bending with the support of a yoga block, allowing for deeper release and relaxation in the spine. Conclusion: Spine flexion in yoga is a powerful tool for promoting spinal health, mental well-being, and emotional release. By engaging in forward bends and spine flexion poses, yoga practitioners can increase flexibility, reduce stress, improve posture, and foster a sense of peace and calm. The act of folding forward also encourages a deeper connection between mind and body, helping to release tension and promote overall vitality. Regular practice of spine flexion enhances the body’s ability to let go of physical and emotional blocks, leading to a sense of well-being and balance.
The Power of Hatha Yoga: A Complete Guide
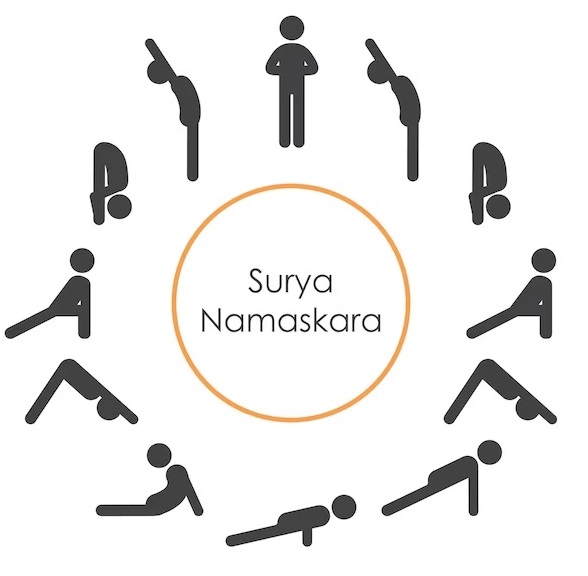
The Power of Hatha Yoga: A Complete Guide Hatha Yoga is the foundation of most modern yoga styles. It focuses on physical postures (āsanas), breath control (prāṇāyāma), and meditation to create balance between body, mind, and energy. Whether you’re a beginner or an advanced practitioner, understanding Hatha Yoga can deepen your practice and enhance well-being. 1. What is Hatha Yoga? “Hatha” comes from Sanskrit: “Ha” (Sun)– Represents masculine, active energy. “Tha” (Moon)– Represents feminine, passive energy. Hatha Yoga balances these energiesthrough movement, breathwork, and mindfulness. It is often considered the preparatory stagefor deeper meditative practices. 2. Benefits of Hatha Yoga Physical Benefits ✅ Improves flexibility & strength✅ Enhances posture & balance✅ Supports joint health & mobility✅ Boosts digestion & metabolism Mental & Emotional Benefits ✅ Reduces stress & anxiety✅ Enhances focus & mental clarity✅ Promotes emotional balance✅ Supports better sleep & relaxation Energetic Benefits ✅ Activates the chakras (energy centers)✅ Aligns breath & movement for harmony✅ Prepares the body for higher states of consciousness 3. Key Elements of Hatha Yoga 1. Āsanas (Yoga Postures) Hatha Yoga includes classic postures that build strength, flexibility, and awareness. Some key āsanas: Tādāsana (Mountain Pose)– Foundation for alignment Adho Mukha Śvānāsana (Downward Dog)– Stretches & strengthens Vīrabhadrāsana (Warrior Poses)– Builds focus & endurance Paścimottānāsana (Seated Forward Fold)– Calms the mind Śavāsana (Corpse Pose)– Deep relaxation 2. Prāṇāyāma (Breath Control) Breathwork is central to Hatha Yoga. Some common techniques: Nāḍī Śodhana (Alternate Nostril Breathing)– Balances energy Kapalabhāti (Skull-Shining Breath)– Energizes & detoxifies Bhrāmarī (Bee Breath)– Reduces stress & calms the mind 3. Bandhas (Energy Locks) Engaging muscular contractions to direct prāṇa (life force): Mūla Bandha– Pelvic floor lock (root energy) Uḍḍīyāna Bandha– Abdominal lock (solar plexus activation) Jālandhara Bandha– Throat lock (mental clarity) 4. Dhyāna (Meditation) Hatha Yoga prepares the body for meditation by removing restlessness. Common meditation techniques include: Mindfulness meditation– Observing breath & thoughts Mantra meditation– Chanting sacred sounds (e.g., “Om”) Visualization– Focusing on energy centers (chakras) 4. A Simple Hatha Yoga Sequence for Balance Beginner-Friendly Hatha Flow (15-20 min) Tādāsana (Mountain Pose)– 1 min Adho Mukha Śvānāsana (Downward Dog)– 5 breaths Vīrabhadrāsana I & II (Warrior I & II)– 5 breaths each side Paścimottānāsana (Seated Forward Fold)– 5 breaths Śavāsana (Final Relaxation)– 5-10 min 💡 Tip: End with 5 minutes of prāṇāyāma or meditation for a complete practice. 5. How to Start a Hatha Yoga Practice ✅ Start Slow – Focus on alignment & breath awareness.✅ Be Consistent – Practice at least 3-4 times a week.✅ Listen to Your Body – Avoid forcing flexibility or strength.✅ Use Props – Blocks, straps, and cushions help with alignment.✅ Combine Movement & Stillness – Balance active poses with relaxation. Final Thoughts Hatha Yoga is a powerful practice that builds physical strength, mental clarity, and inner peace. Whether you’re seeking stress relief, better health, or spiritual growth, Hatha Yoga provides a solid foundation for holistic well-being.
What Is Prana? Definition of Prana & the 5 Vital Energies

What Is Prana? Definition of Prana & the 5 Vital Energies Prana is the Sanskrit word for life force energy—the vital energy that sustains all living beings. It flows through the nadis (energy channels) and is regulated by breath, movement, and awareness. In yoga and Ayurveda, prana is the foundation of health, consciousness, and vitality. In this guide, you’ll learn:✅ What prana is & how it works✅ The 5 types of prana (Pancha Vayus)✅ How to balance prana through yoga & breathwork 1. What Is Prana? 🔹 Definition: Prana is the subtle energy that flows through the body, keeping us alive.🔹 Source: It comes from breath, food, sunlight, and thoughts.🔹 Function: It powers physical, mental, and spiritual processes. In short, prana is what makes life possible! Without prana, the body is just a lifeless shell. Prana in Different Traditions:✔ Yoga & Ayurveda – Prana is the energy that flows through the nadis.✔ Traditional Chinese Medicine – Similar to Qi (Chi), the life force.✔ Western Science – Can be compared to bioelectric energy in the body. 2. The 5 Types of Prana (Pancha Vayus) Prana is not just one energy—it has five major subdivisions (Vayus), each with a unique function: 1️⃣ Prana Vayu (Inward Energy) ✔ Located in the chest & head✔ Governs breathing, heartbeat, and mental clarity✔ Activated through deep breathing & meditation 2️⃣ Apana Vayu (Downward Energy) ✔ Located in the lower abdomen & pelvis✔ Governs elimination (urination, digestion, menstruation, childbirth)✔ Balanced through grounding yoga poses & hip openers 3️⃣ Samana Vayu (Digestive Energy) ✔ Located in the stomach & navel✔ Controls digestion, absorption, and metabolism✔ Boosted through core-strengthening exercises & mindful eating 4️⃣ Udana Vayu (Upward Energy) ✔ Located in the throat & upper body✔ Governs speech, self-expression, and spiritual growth✔ Activated through chanting, singing, and pranayama 5️⃣ Vyana Vayu (Circulatory Energy) ✔ Located throughout the entire body✔ Controls blood circulation, nerve impulses, and movement✔ Balanced through dynamic yoga flows & full-body awareness When all five Vayus are in harmony, prana flows smoothly, leading to optimal health and vitality. 3. How to Cultivate & Balance Prana 🌬️ 1. Breathwork (Pranayama) ✔ Nadi Shodhana (Alternate Nostril Breathing) – Balances prana flow✔ Bhramari (Bee Breath) – Calms the mind & nervous system✔ Kapalabhati (Skull-Shining Breath) – Energizes & clears stagnant energy 🧘 2. Yoga Poses (Asana) ✔ Chest openers (e.g., Cobra, Fish Pose) – Enhance Prana Vayu✔ Hip openers (e.g., Malasana, Pigeon Pose) – Ground Apana Vayu✔ Twists (e.g., Seated Twist, Revolved Triangle) – Activate Samana Vayu 🍃 3. Healthy Lifestyle & Diet ✔ Eat fresh, plant-based foods rich in prana✔ Spend time in nature & sunlight✔ Avoid negative thoughts & stress, which deplete prana 🕉 4. Meditation & Mantras ✔ Meditation increases mental & spiritual prana✔ Chanting “Om” or Bija Mantras enhances Udana Vayu 4. Signs of Prana Imbalance Too little prana?🚫 Fatigue, brain fog, low motivation🚫 Digestive issues, poor circulation🚫 Anxiety, stress, or emotional instability Too much prana?🚀 Restlessness, overthinking🚀 Insomnia, hyperactivity🚀 Nervous system overload Balancing prana through breath, movement, and mindfulness creates inner harmony & well-being. Final Thoughts Prana is the life force that sustains us, and understanding its flow can enhance vitality, mental clarity, and spiritual awareness. By practicing pranayama, yoga, and mindful living, you can awaken and balance your prana for a healthier, more vibrant life.
What Is a Chakra: 7 Chakras Signs of Being Balanced or Imbalanced

What Is a Chakra: 7 Chakras Signs of Being Balanced or Imbalanced A chakra is a center of energy in the body according to yogic philosophy and Ayurveda. The word “chakra” comes from the Sanskrit word for “wheel” or “disk” and refers to a spinning wheel of energy. These energy centers are believed to regulate not just physical health, but emotional, mental, and spiritual well-being as well. According to yogic traditions, there are seven main chakras, each associated with specific aspects of life, personality, and body functions. The Seven Main Chakras: Root Chakra (Muladhara) Location:Base of the spine, near the coccyx. Element:Earth Color:Red Mantra:“LAM” Associated with:Survival, stability, grounding, and security. Balanced Signs:Feeling grounded, safe, secure, and connected to the physical world. A stable foundation in life and relationships. Imbalanced Signs:Anxiety, fear, insecurity, financial struggles, or feeling ungrounded and disconnected from the world. Sacral Chakra (Svadhisthana) Location:Lower abdomen, about two inches below the navel. Element:Water Color:Orange Mantra:“VAM” Associated with:Creativity, sexuality, emotions, pleasure, and relationships. Balanced Signs:Creative energy, healthy emotional expression, and vibrant sexual energy. Enjoying intimacy and connection with others. Imbalanced Signs:Lack of creativity, sexual dysfunction, emotional instability, guilt, or difficulty forming emotional connections. Solar Plexus Chakra (Manipura) Location:Upper abdomen, above the navel, in the area of the stomach. Element:Fire Color:Yellow Mantra:“RAM” Associated with:Personal power, self-esteem, confidence, and motivation. Balanced Signs:Confidence, self-control, decision-making ability, and strong willpower. A clear sense of purpose and direction in life. Imbalanced Signs:Low self-esteem, lack of confidence, difficulty taking action, and feelings of powerlessness or anger. Heart Chakra (Anahata) Location:Center of the chest, near the heart. Element:Air Color:Green (sometimes pink) Mantra:“YAM” Associated with:Love, compassion, forgiveness, and relationships. Balanced Signs:Ability to give and receive love freely, compassion, forgiveness, and emotional balance. Imbalanced Signs:Emotional coldness, difficulty expressing love, fear of intimacy, grief, or feeling disconnected from others. Throat Chakra (Vishuddha) Location:Throat and neck area. Element:Ether (Space) Color:Blue Mantra:“HAM” Associated with:Communication, self-expression, truth, and creativity. Balanced Signs:Clear, honest communication, expressing oneself freely, and living in alignment with one’s truth. Imbalanced Signs:Difficulty expressing oneself, fear of speaking, lying, or not being able to communicate effectively or assertively. Third Eye Chakra (Ajna) Location:Between the eyebrows, in the center of the forehead. Element:Light Color:Indigo Mantra:“OM” Associated with:Intuition, wisdom, insight, and mental clarity. Balanced Signs:Strong intuition, mental clarity, wisdom, and ability to see the bigger picture. A sense of inner knowing and deep understanding. Imbalanced Signs:Lack of direction, closed-mindedness, difficulty making decisions, and inability to trust intuition. Crown Chakra (Sahasrara) Location:Top of the head, or slightly above it. Element:Thought or Consciousness Color:Violet or White Mantra:“AH” Associated with:Spirituality, divine connection, enlightenment, and higher consciousness. Balanced Signs:Feeling connected to the universe, a sense of spiritual purpose, and being in tune with higher wisdom and consciousness. Imbalanced Signs:Spiritual disconnection, lack of direction in life, feeling isolated, or a sense of purposelessness. Signs of Being Balanced or Imbalanced in the Chakras: Balanced Chakras: Physical Well-Being:The body functions properly, with no specific aches or issues related to the chakra. Emotional Balance:You feel emotionally stable and able to deal with challenges in a constructive way. Mental Clarity:You experience clear thinking and a sense of purpose. You’re able to make decisions confidently and trust your intuition. Spiritual Connection:You feel connected to a higher power, grounded in your beliefs, and at peace with the universe. Imbalanced Chakras: Physical Symptoms:Each chakra’s imbalance can manifest physically in specific areas of the body. For example, issues with digestion might be linked to an imbalance in the solar plexus chakra, or problems with communication could be connected to the throat chakra. Emotional Turmoil:When chakras are imbalanced, emotional struggles such as anxiety, fear, sadness, or frustration may arise. You may feel stuck or unable to move forward. Mental Blockages:Imbalances can also cause confusion, indecisiveness, or lack of clarity. You may have trouble focusing or trusting your inner wisdom. Spiritual Disconnect:An imbalanced crown chakra, for instance, can cause feelings of spiritual disconnect or an inability to feel aligned with your higher purpose. How to Balance the Chakras: Yoga and Asana Practice: Specific yoga poses can help open and balance the chakras. For example, Tree Pose (Vrikasana) for the root chakra or Camel Pose (Ustrasana) for the heart chakra. Meditation: Practicing chakra meditation, where you focus on each chakra, visualize its color, or chant specific mantras, can help bring balance. Breathing Exercises (Pranayama): Breathing techniques like Nadi Shodhana (alternate nostril breathing) or Kapalbhati (skull shining breath) can balance energy flow and calm the mind. Crystal Healing: Certain crystals are associated with each chakra. For example, amethyst for the crown chakra, rose quartz for the heart chakra, and citrine for the solar plexus chakra. Aromatherapy: Essential oils like lavender for the crown chakra or sandalwood for the root chakra can help balance the energy centers. Diet and Nutrition: Eating foods that correspond with each chakra’s energy can help. For example, grounding foods like root vegetables for the root chakra or leafy greens for the heart chakra. Sound Therapy: Listening to specific sound frequencies or using instruments like Tibetan singing bowls can help restore balance to the chakras. Conclusion: Chakras are fundamental to your well-being, impacting both your physical health and your emotional, mental, and spiritual states. By learning to recognize the signs of imbalances in each chakra and working to heal and restore their balance, you can cultivate a more harmonious life. Regular yoga, meditation, and mindfulness practices are powerful tools to keep your chakras balanced and your energy flowing freely.
Yogic Ways to Build Stronger Groups and Relationships
Yogic Ways to Build Stronger Groups and Relationships Yoga is not just an individual practice—it’s a path to deeper connection, trust, and harmony within communities, relationships, and groups. By integrating yogic principles, mindfulness, and communication techniques, we can create stronger, more supportive relationships in all areas of life, from friendships and families to workplaces and yoga classes. This guide covers: ✅ Yogic principles for healthy relationships✅ How to apply yoga philosophy to group dynamics✅ Asanas, breathwork, and meditation for connection✅ Practical team-building and relationship-strengthening exercises 1. The Yogic Foundation for Strong Relationships Yoga teaches us to approach relationships with awareness, compassion, and presence. Here’s how key yogic principles support stronger groups and connections: A. Yamas: Ethical Guidelines for Connection The Yamas (from Patanjali’s Yoga Sutras) offer foundational wisdom for harmonious relationships: ✔️ Ahimsa (Non-violence): Practice kindness in words and actions.✔️ Satya (Truthfulness): Communicate honestly but with compassion.✔️ Asteya (Non-stealing): Respect others’ time, space, and energy.✔️ Brahmacharya (Moderation): Maintain balance in relationships.✔️ Aparigraha (Non-attachment): Let go of control and expectations. B. Niyamas: Personal Practices for Relationship Growth The Niyamas help us cultivate inner balance, which improves how we interact with others: ✔️ Shaucha (Purity): Maintain clarity in communication and intention.✔️ Santosha (Contentment): Accept others as they are.✔️ Tapas (Discipline): Commit to showing up fully in relationships.✔️ Svadhyaya (Self-Study): Reflect on personal triggers and patterns.✔️ Ishvarapranidhana (Surrender): Trust the natural flow of relationships. 2. Yoga Practices for Building Connection Yoga can be practiced individually or in groups to enhance relationships and team dynamics. A. Partner & Group Yoga Poses Practicing partner yoga or group yoga sequences builds trust, coordination, and communication. ✅ Partner Seated Twist – Enhances active listening & trust✅ Double Tree Pose – Builds balance & harmony✅ Back-to-Back Breathing – Strengthens connection & synchronization✅ Group Circle Pose (Sitting or Standing) – Encourages unity & support Tip: Encourage eye contact and deep breathing to deepen the experience of presence and connection. B. Breathwork (Pranayama) for Group Cohesion Breathwork helps groups sync their energy, calm emotions, and enhance collective focus. ✅ Ujjayi Breath (Ocean Breath) – Creates group harmony & steady energy✅ Nadi Shodhana (Alternate Nostril Breathing) – Balances emotions before discussions✅ Synchronizing Breath – Groups breathe in unison for deep connection Exercise: Try group breathwork before meetings, gatherings, or team-building activities to create a centered, focused space. C. Meditation & Mindfulness for Deeper Connection Practicing meditation together helps build compassion, understanding, and presence in relationships. ✅ Loving-Kindness Meditation (Metta) – Cultivates compassion & goodwill✅ Silent Group Meditation – Strengthens collective presence✅ Shared Intention Setting – Aligns goals & values in relationships Tip: Start team meetings or gatherings with a moment of mindfulness to set a positive tone. 3. Yogic Communication for Healthy Relationships Mindful communication is key to stronger, healthier relationships. Here’s how yogic principles help: A. Conscious Listening & Speaking ✅ Listen fully before responding (pause before speaking).✅ Use “I” statements instead of blaming (“I feel…” vs. “You always…”).✅ Breathe before responding in conflict to stay present. B. Mantras & Affirmations for Harmonious Relationships Mantras help reinforce positive group energy: ✔️ “Lokah Samastah Sukhino Bhavantu” – May all beings be happy and free.✔️ “I see you, I honor you, I respect you.” – For group harmony.✔️ “We are connected, we are strong, we are one.” – For team-building. Tip: Try chanting mantras together before group activities or meetings to create unity. 4. Building a Conscious & Supportive Group Environment A. Creating a Sacred Space for Groups ✔️ Encourage inclusivity & open expression.✔️ Set a group intention or theme.✔️ Use yoga-inspired rituals (lighting a candle, collective breathing). B. Yogic Leadership & Team-Building Leaders and facilitators can apply yogic wisdom to create stronger, more cohesive groups. ✔️ Lead with humility & presence (Seva – selfless service).✔️ Foster a judgment-free space (Ahimsa – non-judgment).✔️ Practice gratitude & group appreciation (Santosha – contentment). Exercise: At the end of each group meeting, express gratitude for each other to strengthen bonds. Applying Yoga to Strengthen Relationships Yoga is not just about personal growth—it’s a path to stronger, more connected relationships. Whether in friendships, family, yoga communities, or workplaces, applying yogic principles, mindfulness, and conscious communication creates deeper trust, harmony, and unity.
Shatkarma: 6 Hatha Yoga Kriyas for Purification and Their Benefits

Shatkarma: 6 Hatha Yoga Kriyas for Purification and Their Benefits Shatkarma (also known as the six actions) refers to a set of yogic cleansing practices in Hatha Yoga designed to purify the body, clear blockages in the energy channels (Nadis), and enhance physical, mental, and spiritual well-being. These six techniques are essential tools for yogis to maintain health, improve vitality, and prepare for deeper stages of meditation and pranayama. The word Shatkarma comes from the Sanskrit words “Shat” meaning six, and “Karma” meaning action, and it refers to the six purification practices that cleanse the body, mind, and energy system. The 6 Shatkarmas (Hatha Yoga Kriyas) and Their Benefits Neti (Nasal Cleansing) Technique: Neti involves cleaning the nasal passages to clear out excess mucus, toxins, and allergens. It is performed by using a Neti pot, a small device filled with saline water that is poured through one nostril, allowing it to exit through the other. Types: Jala Neti(water-based): Uses a saline solution to cleanse the nasal passages. Sutra Neti(thread-based): Involves inserting a sterilized cotton or silk thread through the nostrils and gently pulling it through to clear the nasal passages. Benefits: Clears the sinuses and nasal passages, improving airflow. Reduces allergies and sinus infections. Enhances the sense of smell and mental clarity. Improves pranic flow and prepares the practitioner for pranayama (breathing exercises). Dhauti (Gastric Cleansing) Technique: Dhauti involves various methods to cleanse the digestive tract and eliminate toxins from the stomach and intestines. There are multiple forms of Dhauti: Vaman Dhauti: Induced vomiting by drinking salty water and then vomiting it out to cleanse the stomach. Vastra Dhauti: Swallowing a long piece of cloth and then pulling it out to cleanse the digestive tract. Danta Dhauti: Cleaning the teeth and gums. Benefits: Purifies the digestive system, enhancing digestion and metabolism. Removes toxins (Ama) from the body. Helps in alleviating chronic constipation, bloating, and indigestion. Detoxifies the liver and stomach, which improves overall health Basti (Colon Cleansing) Technique: Basti involves a yogic form of colon cleansing, typically using water or air, similar to an enema. The practitioner either uses water (Jala Basti) or other techniques to cleanse the large intestine. Benefits: Cleanses the colon, removing impurities and toxins. Improves digestion, and helps in the prevention of constipation and bloating. Stimulates the elimination process and enhances nutrient absorption. Purifies the lower abdominal area, promoting overall health. Kapalbhati (Breath of Fire) Technique: Kapalbhati is a form of rapid, forceful exhalation followed by passive inhalation. It involves sitting in a comfortable position and performing quick, short exhales while pulling the belly in. Benefits: Clears the mind and increases mental clarity. Energizes the body and promotes a feeling of freshness and lightness. Strengthens the lungs and diaphragm. Stimulates digestion and helps detoxify the body by expelling toxins. Improves circulation and oxygenates the body. Trataka (Concentration on a Flame) Technique: Trataka is a meditative practice of gazing at a fixed point or a candle flame to improve concentration and stimulate the third eye chakra (Ajna). It helps to develop single-pointed focus and mental clarity. Benefits: Improves concentration, mental clarity, and focus. Strengthens the mind and develops inner stillness. Reduces mental stress and anxiety. Stimulates the pineal gland, improving intuition and awareness. Enhances vision by improving eye health and reducing strain. Nauli (Abdominal Churning) Technique: Nauli involves the controlled movement of the abdominal muscles. The practitioner performs this by isolating the abdominal muscles and churning them in a circular motion. This technique is typically practiced after mastering Uddiyana Bandha(the abdominal lock). Benefits: Strengthens the abdominal muscles and tones the digestive system. Stimulates the digestive organs (liver, stomach, intestines) and improves digestion. Improves circulation and cleanses the abdominal organs. Promotes energy flow through the navel center (Manipura chakra). Detoxifies the body by improving the function of the digestive and elimination systems. Additional Benefits of Shatkarma Practice Purification of the Body: These kriyas clear out toxins (ama) and impurities that accumulate in the body, resulting in a healthier, more vibrant system. Balances the Nervous System: Through the practice of pranayama (breathwork) and meditation techniques like Trataka, the Shatkarma practices help balance the nervous system, promoting calmness and reducing stress. Prepares the Body for Meditation: The purification process prepares the body to sit for long periods of meditation, allowing practitioners to achieve greater spiritual awareness. Enhances Physical Health: By promoting good digestion, detoxification, and mental clarity, these kriyas support the overall well-being of the practitioner. How to Practice Shatkarma Safely Seek Guidance: Many of the Shatkarma techniques are advanced practices that require proper guidance from an experienced instructor. It’s important to learn them under supervision to ensure they are performed correctly and safely. Be Mindful of Your Body: Some of the practices, like Dhauti and Basti, can be intense, so they are not recommended for individuals with certain medical conditions, like heart problems or gastrointestinal issues. Always listen to your body and avoid practices that cause discomfort. Practice Regularly, but Not Excessively: The Shatkarma practices are meant to be performed as part of a holistic yoga practice, not daily cleansing rituals. Practice them regularly but with balance to avoid overstimulating the body. Conclusion Shatkarma is an integral part of Hatha Yoga, designed to purify the body and mind. By incorporating these six kriyas into your practice, you can experience enhanced health, vitality, and mental clarity. These practices not only cleanse the physical body but also support the mental and emotional aspects of well-being, setting the foundation for deeper meditation and spiritual growth. However, it’s crucial to approach Shatkarma with care, ideally under the guidance of a skilled teacher, to ensure that you perform these techniques safely and effectively.
Yoga Poses for Constipation Relief
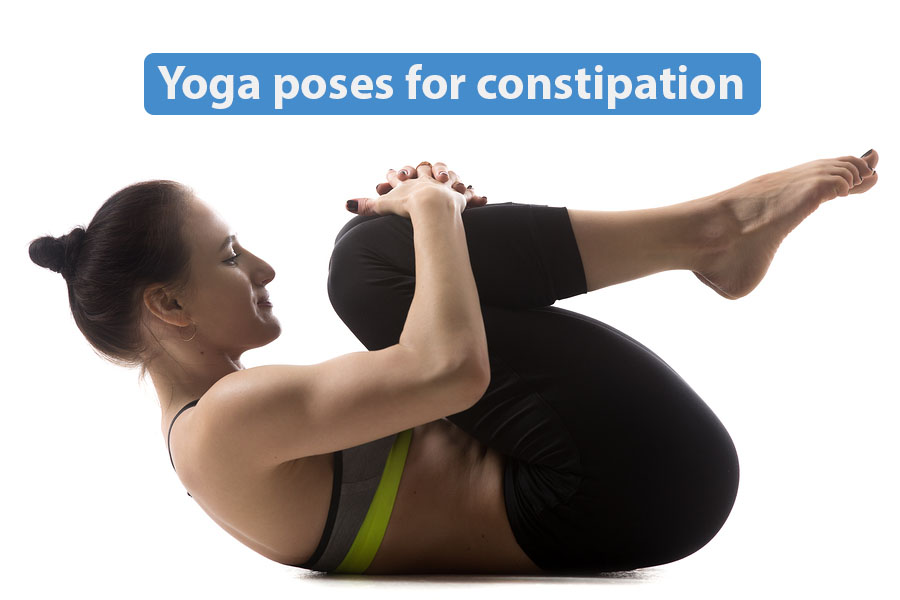
Yoga Poses for Constipation Relief Yoga can stimulate digestion, relieve bloating, and improve bowel movements by gently massaging the abdominal organs and improving gut motility. Here are some effective poses to help with constipation: 1. Wind-Relieving Pose (Pawanmuktasana) ✔ How it helps: Massages intestines, relieves gas, and stimulates digestion.✔ How to do it: Lie on your back, bring one or both knees to your chest. Hug your knees, pressing them gently into your stomach. Hold for 20–30 seconds and breathe deeply. 2. Seated Forward Bend (Paschimottanasana) ✔ How it helps: Compresses abdominal organs, aiding digestion and bowel movement.✔ How to do it: Sit with legs extended straight. Inhale, lengthen your spine, and exhale as you fold forward, reaching for your feet. Hold for 30 seconds to 1 minute. 3. Cat-Cow Pose (Marjariasana-Bitilasana) ✔ How it helps: Stimulates the digestive system by massaging abdominal organs.✔ How to do it: Start on all fours (hands under shoulders, knees under hips). Inhale, arch your back (Cow Pose). Exhale, round your spine, tucking your chin (Cat Pose). Repeat for 1–2 minutes. 4. Supine Twist (Supta Matsyendrasana) ✔ How it helps: Twisting massages the intestines, helping with digestion.✔ How to do it: Lie on your back, bring one knee across your body toward the floor. Keep your shoulders on the mat and look in the opposite direction. Hold for 30 seconds and switch sides. 5. Malasana (Yogi Squat) ✔ How it helps: Opens the hips and stimulates bowel movement.✔ How to do it: Stand with feet slightly wider than hip-width apart. Squat down, keeping your heels on the floor if possible. Press your elbows against your inner knees and hold for 30 seconds. 6. Child’s Pose (Balasana) ✔ How it helps: Relaxes the abdominal muscles and promotes digestion.✔ How to do it: Kneel on the floor, bring your forehead to the mat. Extend arms forward or rest them by your sides. Hold for 1 minute. 7. Bridge Pose (Setu Bandhasana) ✔ How it helps: Improves digestion and stimulates the abdominal organs.✔ How to do it: Lie on your back with knees bent and feet flat on the ground. Lift your hips while keeping your shoulders down. Hold for 30 seconds. Bonus Tips for Constipation Relief ✔ Hydrate – Drink plenty of water to help digestion.✔ Eat Fiber-Rich Foods – Fruits, vegetables, and whole grains promote bowel movement.✔ Practice Deep Breathing – Helps reduce stress, which can impact digestion.✔ Be Consistent – Regular yoga practice can prevent constipation.