
How to Lead in Challenging Times

How to Lead in Challenging Times Leading in challenging times requires a balance of decisiveness, empathy, and adaptability. Whether you’re managing a team during economic uncertainty, organizational change, or global crises, here are key strategies to help you navigate through turbulence effectively: 1. Communicate Transparently and Frequently Clarity Over Ambiguity:Share as much information as you can about the situation and your vision for the future. Clear communication builds trust and reduces anxiety. Regular Updates:Hold consistent briefings or check-ins, even if the news isn’t always positive. Transparency about challenges and progress keeps everyone aligned. Active Listening:Encourage feedback and questions. By listening to your team’s concerns, you can address issues before they escalate. 2. Demonstrate Empathy and Support Understand Emotional Impact:Recognize that challenging times can take an emotional toll. Offer genuine support and understanding to team members. Personal Check-Ins:Make time for one-on-one conversations. A personal touch can help individuals feel seen and supported. Flexible Policies:Where possible, adapt work policies to help employees manage stress, whether through flexible hours or additional wellness resources. 3. Cultivate Adaptability and Resilience Embrace Change:View challenges as opportunities to innovate. Be open to new approaches and encourage your team to experiment with creative solutions. Learn from Setbacks:Use failures and challenges as learning moments. This mindset not only builds resilience but also fosters a culture of continuous improvement. Encourage Flexibility:Equip your team with the tools and skills to pivot quickly. Cross-training and agile work methods can be invaluable in uncertain environments. 4. Maintain a Clear Vision and Purpose Articulate a Compelling Goal:Remind your team why their work matters. A strong, shared purpose can be a powerful motivator during tough times. Align Actions with Values:Ensure that decisions and actions reflect the core values of your organization. This alignment helps reinforce a sense of unity and direction. Focus on What You Can Control:While external factors may be unpredictable, zero in on areas where you can make a difference. Clear priorities help maintain momentum. 5. Empower Your Team Delegate and Trust:Allow team members to take ownership of their roles. Empowerment builds confidence and can lead to innovative solutions. Recognize Contributions:Celebrate small wins and acknowledge efforts. Recognition not only boosts morale but also encourages continued engagement. Foster Collaboration:Create an environment where ideas are shared openly. Collaborative problem-solving can uncover fresh perspectives and effective strategies. 6. Lead by Example Show Resilience:Your attitude sets the tone for the entire team. Displaying calm and confidence in adversity can inspire others to stay focused and positive. Invest in Your Own Growth:Continually seek feedback and opportunities to learn. Self-awareness and improvement are key to staying effective as a leader. Prioritize Self-Care:Ensure you manage your own stress and well-being. A leader who models self-care encourages their team to do the same, creating a healthier work environment. Conclusion In challenging times, leadership is about more than just steering the ship—it’s about nurturing the crew, staying agile, and keeping a clear vision at the helm. By communicating openly, showing empathy, fostering resilience, and leading by example, you can help your team navigate uncertainty and emerge stronger together. Embracing these strategies not only addresses immediate challenges but also lays the groundwork for long-term success and a resilient organizational culture.
How to Sequence and Design a Yoga Class for Beginners
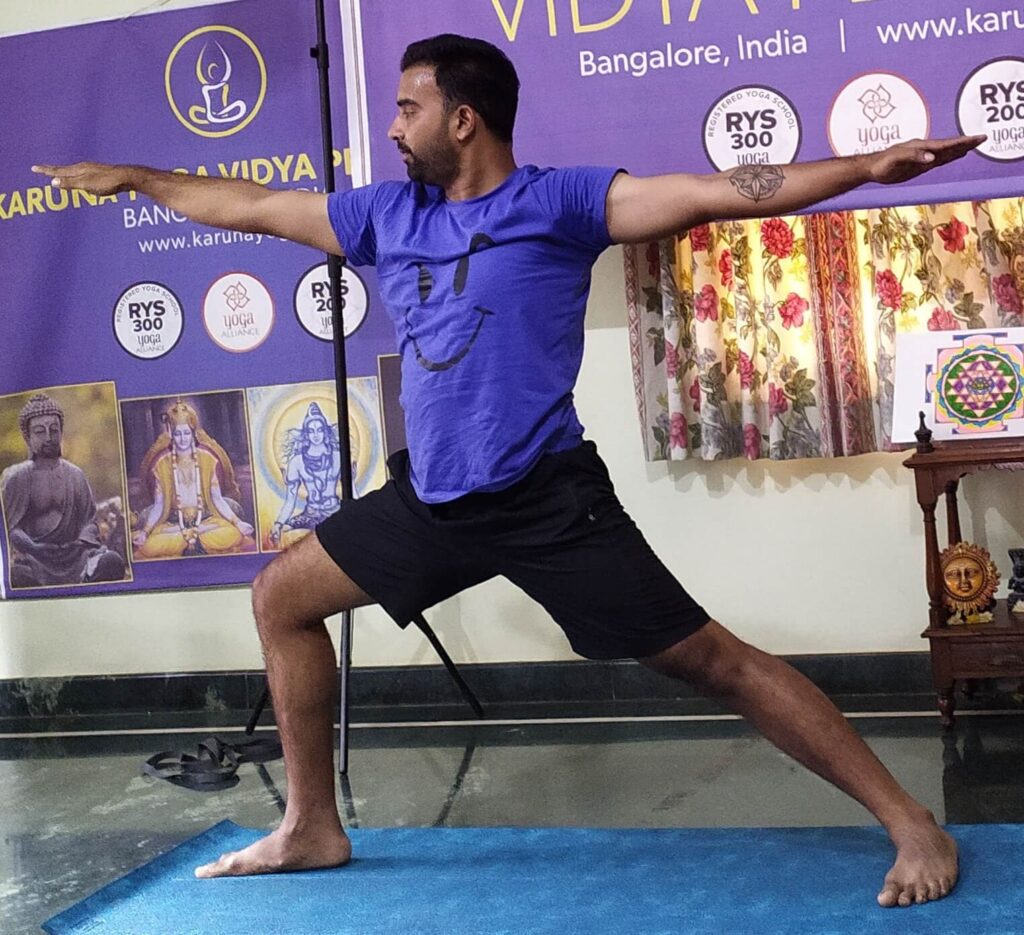
How to Sequence and Design a Yoga Class for Beginners Designing a yoga class for beginners requires a thoughtful approach to ensure that students feel comfortable, confident, and inspired. The key is to create a well-rounded session that gradually introduces foundational yoga poses, emphasizes proper alignment, and fosters mindfulness. Below is a step-by-step guide to help you design a balanced and accessible class for beginners. 1. Set the Intention and Tone of the Class Establish a Theme: Start by deciding on an overall theme or intention for the class. For beginners, this could be something simple like “building awareness,” “grounding,” or “breathing with movement.” A clear intention helps to create a focused experience. Create a Welcoming Atmosphere: Begin by introducing yourself and inviting students to connect with their breath. Make sure the environment feels inviting and calm. This sets the tone for relaxation and presence throughout the class. 2. Warm-Up and Centering (5-10 Minutes) Goal: Gently introduce movement, encourage mindfulness, and focus on the breath. How to Do It: Start with a few minutes of seated breathing exerciseslike deep belly breathing (diaphragmatic breathing) or Nadi Shodhana (alternate nostril breathing) to help the students calm their minds. Include gentle neck rolls, shoulder shrugs, or seated side stretches to release any initial tension and invite students to tune in to their bodies. Incorporate some gentle seated posessuch as Easy Pose (Sukhasana) with a few minutes of mindful breathing. 3. Sun Salutation (10-15 Minutes) Goal: Introduce fundamental poses and build a dynamic flow that warms the body. How to Do It: Sun Salutation A (Surya Namaskar A)is a great way to link breath with movement, and it’s easy for beginners to follow. If your students are unfamiliar with it, break it down into its individual movements first: Start with Mountain Pose (Tadasana): Feet hip-width apart, arms at the sides, focusing on grounding. Inhale: Reach arms overhead into Upward Salute (Urdhva Hastasana). Exhale: Forward fold into Standing Forward Bend (Uttanasana). Inhale: Halfway lift to Ardha Uttanasana(flat back). Exhale: Step back into Plank Poseand gently lower into Knees, Chest, Chin or Chaturanga (if appropriate). Inhale: Cobra Pose (Bhujangasana)or Upward-Facing Dog (Urdhva Mukha Svanasana). Exhale: Downward-Facing Dog (Adho Mukha Svanasana). Hold Downward Dogfor 3-5 breaths, encouraging students to focus on breath and body alignment. Walk or step forward, and reverse the flow back to standing. Repeat the sequence 3-5 times, linking breath to movement. 4. Standing Poses and Balancing (10-15 Minutes) Goal: Build strength, flexibility, and focus. How to Do It: Warrior I (Virabhadrasana I): Teach students to focus on strong legs and opening the chest while grounding through the feet. Ensure the front knee is aligned over the ankle. Warrior II (Virabhadrasana II): This pose promotes stability and balance. Encourage students to open their hips and shoulders while maintaining equal weight in both feet. Tree Pose (Vrikshasana): A great introduction to balancing poses. Guide students to find a fixed gaze (drishti) to help them balance, and remind them to keep the knee of the lifted leg open. You can add Side Angle Pose (Utthita Parsvakonasana)and Triangle Pose (Trikonasana) for more lateral stretching and balance. 5. Core Strengthening (5-7 Minutes) Goal: Strengthen the core muscles for stability and overall body awareness. How to Do It: Introduce Tabletop Pose (Bharmanasana), then move to Cat-Cow Pose (Marjaryasana-Bitilasana)to warm up the spine. Introduce Boat Pose (Navasana), holding for a few breaths, encouraging students to engage their core. Plank Pose (Phalakasana): Hold for a few breaths, reminding students to keep their bodies in a straight line. Optionally, add Side Plank (Vasisthasana)to build strength in the arms and core. 6. Floor Work and Stretching (10-15 Minutes) Goal: Focus on flexibility, relaxation, and cooling the body after the more strenuous standing poses. How to Do It: Seated Forward Fold (Paschimottanasana): Instruct students to lengthen the spine first and then fold forward gently. This helps stretch the hamstrings and calm the nervous system. Reclined Butterfly Pose (Supta Baddha Konasana): Great for opening the hips and relaxing the lower body. Bridge Pose (Setu Bandhasana): A gentle backbend to open the chest and strengthen the lower body. Supine Twist (Supta Matsyendrasana): Encourage students to gently twist their spines and release any tension. 7. Savasana (Corpse Pose) and Closing (5-10 Minutes) Goal: Relax, restore, and integrate the benefits of the practice. How to Do It: Lead students into Savasana (Corpse Pose), guiding them to lie flat on their backs with arms by their sides, palms facing up. Encourage students to focus on their breath and allow their bodies to relax completely. Optionally, guide them through a short body scanto release tension in each part of the body. Close the class by bringing students into a seated position. Offer a few words of encouragement or a closing affirmation. Finish with a collective Namaste. Additional Tips for Teaching Beginners: Offer Modifications: Always offer modifications for poses, especially those that can be challenging for beginners (like Plank Pose or Chaturanga). Use props (blocks, straps, blankets) to make the practice more accessible. Focus on Alignment: Emphasize alignment cues to ensure that beginners are practicing safely. For example, in Downward-Facing Dog, remind them to press their heels down and lengthen their spine rather than force their heels to touch the floor. Encourage Breath Awareness: Continuously remind students to link their breath with their movements. Encourage them to inhale to lift or lengthen and exhale to release or deepen the stretch. Start Slow: Avoid overwhelming beginners with too many advanced poses or flows. Start slow and build the intensity gradually, giving them time to learn and refine the foundational poses. Create a Safe Space: Make sure students feel comfortable asking questions and giving feedback. Foster an environment of non-judgment and body positivity. Sample Beginner Yoga Class Sequence: Intention & Centering: 5 minutes (Breathing exercises, setting an intention) Warm-Up: 5 minutes (Gentle stretches, neck rolls) Sun Salutations: 10 minutes (Surya Namaskar A, breaking down the sequence) Standing Poses: 10-15 minutes (Warrior I, II, Tree Pose) Core Strengthening: 5-7 minutes (Boat Pose, Plank) Floor Poses: 10 minutes (Seated Forward Fold,
Basic Yoga Questions & Answers for Beginners
Basic Yoga Questions & Answers for Beginners 1. What is Yoga? Yoga is a mind-body practice that combines physical postures (asanas), breathing techniques (pranayama), and meditation to improve overall well-being. 2. Do I Need to Be Flexible to Start Yoga? No, flexibility improves with practice. Yoga is about progress, not perfection. 3. What Should I Wear for Yoga? Wear comfortable, stretchy clothes that allow free movement. 4. How Often Should I Practice Yoga? Start with 2-3 sessions per week and increase as you get comfortable. Even 10-15 minutes daily can be beneficial. 5. Can Yoga Help with Weight Loss? Yes, dynamic styles like Vinyasa and Power Yoga burn calories, while all yoga styles improve mindfulness, reducing stress-related eating. 6. Is Yoga a Good Workout? Yes, yoga strengthens muscles, improves flexibility, and enhances endurance. Some styles, like Ashtanga or Power Yoga, provide a vigorous workout. 7. Can I Do Yoga if I Have Injuries? Consult a doctor first. Gentle styles like Hatha or Restorative Yoga can help with recovery, but avoid poses that strain injuries. 8. What’s the Best Time to Do Yoga? Morning yoga boosts energy for the day, while evening yoga helps with relaxation and sleep. 9. Should I Eat Before Yoga? It’s best to practice on an empty stomach or eat a light meal 1-2 hours before. 10. Do I Need Special Equipment? A yoga mat is essential, but blocks, straps, and cushions can help beginners with posture alignment. Best Tips for Yoga Beginners Start with Basic Poses– Learn foundational poses like Downward Dog, Warrior Pose, and Child’s Pose before moving to advanced ones. Focus on Breathing– Proper breathing (pranayama) enhances relaxation and improves posture alignment. Go Slow & Be Patient– Progress takes time. Avoid rushing into complex poses. Listen to Your Body– Never push through pain; modify poses as needed. Practice Consistently– Even a few minutes a day brings benefits over time. Use Props for Support– Blocks and straps help with flexibility and balance. Follow a Guided Class– Start with beginner-friendly classes online or with an instructor. Create a Comfortable Space– Practice in a quiet, clutter-free area for better focus. Warm Up & Cool Down– Gentle stretches before and after prevent injury. Enjoy the Journey– Yoga is about self-care, not competition. Stay present and enjoy the process.
How Meditation is Transforming the Lives of Prison Inmates

How Meditation is Transforming the Lives of Prison Inmates Meditation is bringing hope, healing, and transformation to prison inmates worldwide. By helping them manage stress, anger, and trauma, meditation offers a path to inner peace, self-reflection, and rehabilitation. Many prison programs now integrate meditation as a tool for emotional healing and behavioral change. Key Benefits of Meditation for Prison Inmates 1. Reduces Stress & Anxiety Inmates face high levels of stress due to confinement and uncertainty. Meditation lowers cortisol levels, promoting calmness and emotional balance. 2. Controls Anger & Impulsivity Helps inmates respondrather than react to situations. Enhances self-control, reducing violent behavior. 3. Supports Mental Health Decreases symptoms of depression and PTSD. Encourages emotional healing from past trauma. 4. Encourages Self-Reflection & Rehabilitation Helps inmates take responsibility for their actions. Fosters a sense of remorse, self-awareness, and personal growth. 5. Improves Sleep & Reduces Insomnia Meditation relaxes the nervous system, leading to better sleep. Reduces the impact of prison-related stress on mental health. 6. Enhances Focus & Mindfulness Increases patience and concentration, improving decision-making. Helps inmates stay present, avoiding negative thoughts. 7. Lowers Recidivism Rates Inmates who practice meditation are less likely to return to crimeafter release. Meditation helps them reintegrate into society with a positive mindset. 8. Strengthens Compassion & Empathy Meditation, especially Loving-Kindness (Metta) meditation, fosters forgiveness and kindness. Inmates develop a deeper sense of empathy towards others. Real-Life Impact: Meditation in Prisons Worldwide ✔ Vipassana Meditation Programs – Introduced in prisons across India, the U.S., and other countries, helping inmates experience deep inner change.✔ Mindfulness-Based Prison Programs – Organizations like the Prison Mindfulness Institute train inmates in stress reduction techniques.✔ Dalai Lama & Buddhist Teachings in Prisons – Many prisons incorporate Buddhist mindfulness teachings to promote peace. A Second Chance Through Meditation Meditation is proving that even within prison walls, inner freedom is possible. It empowers inmates to break the cycle of crime, anger, and suffering, giving them hope for a better future.
A Beginner’s Guide to Ashtanga Yoga: Poses & Benefits
A Beginner’s Guide to Ashtanga Yoga: Poses & Benefits Ashtanga Yoga is a dynamic and structured yoga system that combines breath, movement, and focus into a powerful practice. It consists of six progressive series, beginning with the Primary Series, designed to detoxify, strengthen, and align the body. What Makes Ashtanga Yoga Unique? ✔ Set Sequence – Practiced in a specific order every time.✔ Vinyasa Flow – Breath is linked with movement for a dynamic flow.✔ Bandhas (Energy Locks) – Engages core muscles to control energy.✔ Drishti (Gaze Point) – Enhances concentration and mindfulness.✔ Self-Discipline (Tapas) – Encourages commitment to personal growth. Basic Ashtanga Yoga Poses for Beginners These poses come from the Primary Series (Yoga Chikitsa), which focuses on detoxification and alignment. 1. Sun Salutation A & B (Surya Namaskara A & B) ✔ Why? Warms up the body, increases flexibility, and builds endurance.✔ Key Steps: Includes Downward Dog, Forward Fold, Plank, and Cobra Pose in a flowing sequence. 2. Standing Poses Padangusthasana (Big Toe Pose)– Stretches hamstrings and calms the mind. Trikonasana (Triangle Pose)– Improves balance, digestion, and core strength. Parsvottanasana (Intense Side Stretch)– Enhances flexibility and posture. 3. Seated Poses Paschimottanasana (Seated Forward Bend)– Boosts digestion and relieves stress. Janu Sirsasana (Head-to-Knee Pose)– Stretches hamstrings and strengthens the spine. Marichyasana (Twist Pose)– Detoxifies and improves spinal flexibility. 4. Backbends & Strength Poses Bhujangasana (Cobra Pose)– Opens the chest and strengthens the spine. Setu Bandhasana (Bridge Pose)– Stimulates the nervous system and relieves stress. Urdhva Dhanurasana (Wheel Pose)– Deepens back flexibility and boosts energy. 5. Finishing Poses (Relaxation & Meditation) Padmasana (Lotus Pose)– Traditional meditation posture. Sirsasana (Headstand, for advanced practitioners)– Improves circulation and mental focus. Savasana (Corpse Pose)– Allows the body to absorb the benefits of the practice. Benefits of Practicing Ashtanga Yoga ✔ Enhances Strength & Flexibility – Engages the entire body.✔ Boosts Mental Focus & Discipline – Helps build consistency and self-awareness.✔ Detoxifies the Body – Sweating and deep breathing release toxins.✔ Improves Digestion & Circulation – Stimulates the internal organs.✔ Increases Energy & Reduces Stress – Promotes a sense of inner peace. Tips for Ashtanga Yoga Beginners ✔ Start with Sun Salutations to build strength.✔ Focus on breath and movement synchronization.✔ Don’t rush—progress at your own pace.✔ Practice early in the morning on an empty stomach.✔ Stay committed—consistency is key in Ashtanga Yoga.
Holistic Nutrition for Yoga: Expert Tips for Healthier Eating & Food Cravings

Holistic Nutrition for Yoga: Expert Tips for Healthier Eating & Food Cravings Holistic nutrition and yoga go hand in hand, supporting physical vitality, mental clarity, and spiritual well-being. Here are expert tips for healthier eating and managing food cravings as a yogi: 1. Follow Ayurvedic Principles Identify your dosha(Vata, Pitta, Kapha) and eat accordingly. Favor seasonal, whole, and fresh foodsthat balance your energy. Eat mindfully and in a peaceful environmentto enhance digestion. 2. Prioritize Satvic Foods (Light, Pure, & Energy-Giving) Fresh fruits, vegetables, whole grains, nuts, seeds, and legumes. Herbal teas, fresh juices, and plant-based proteins. Avoid processed, heavy, or overly stimulating foods(excess caffeine, refined sugar). 3. Hydration & Herbal Support Start your day with warm lemon waterto cleanse the system. Drink herbal teas(ginger, tulsi, ashwagandha) for digestion and balance. Stay hydrated with coconut water or infused waterto replenish energy. 4. Manage Food Cravings Naturally Sweet cravings?Choose dates, raw honey, or warm spiced milk. Salty cravings?Opt for lightly salted nuts, olives, or mineral-rich seaweed. Crunch cravings?Try roasted chickpeas, seeds, or veggie chips. Emotional eating?Practice breathwork (pranayama) and mindful meditation before meals. 5. Time Your Meals with Your Body’s Natural Rhythms Eat your biggest meal at middaywhen digestion is strongest. Have a light, early dinnerto improve sleep and avoid bloating. Practice intermittent fasting (12-14 hours overnight)for digestive rest. 6. Mindful Eating Practices for Yogis Eat slowly and chew wellfor better digestion and nutrient absorption. Avoid distractionslike screens while eating—focus on taste and texture. Express gratitudefor your food to cultivate a deeper connection with nourishment.
10 Kundalini Yoga Kriyas for Awakening The Kundalini Shakti

10 Kundalini Yoga Kriyas for Awakening The Kundalini Shakti Kundalini Yoga is a powerful and transformative practice that aims to awaken the dormant Kundalini Shakti (divine energy) residing at the base of the spine. By using a combination of postures, breathing techniques (pranayama), chanting (mantras), and meditation, Kundalini Yoga helps release this energy and allows it to rise through the chakras, leading to heightened spiritual awareness, balance, and vitality. Here are 10 Kundalini Yoga Kriyas (spiritual exercises) that can help in awakening the Kundalini Shakti: 1. Kriya for the Awakening of the Kundalini Purpose: This is a full-body exercise designed to awaken the dormant energy at the base of the spine. How to do: Sit in a comfortable seated position with your spine straight. Begin with deep breathing(long, deep breaths). Inhale deeply, then perform the Sat Kriyaby raising your arms overhead and chanting “Sat” on the inhale, and “Nam” on the exhale, engaging the navel and pumping it towards the spine. Perform for 3–11 minutes. 2. Spinal Flex (for energy activation) Purpose: A simple, powerful practice to activate the spine and energy flow. How to do: Sit in a comfortable position with your legs crossed (Sukhasana or Padmasana). Place your hands on your knees, keeping your spine straight. Inhale as you arch your back and bring your chest forward, pulling your shoulders back. Exhale as you round your spine and bring your chin toward your chest. Repeat this for 3-5 minutes. 3. Breath of Fire (Kapalbhati Pranayama) Purpose: Stimulates the energy at the base of the spine and activates the Kundalini How to do: Sit in a comfortable seated position with a straight spine. Take a deep breath in and begin exhaling in short, rapid bursts through the nose (like a pump), using the diaphragm to push the breath out forcefully. Inhale naturally as the belly expands. Perform for 1-3 minutes, increasing the time with practice. 4. Sat Kriya Purpose: A powerful practice that activates the navel center and stimulates the Kundalini How to do: Sit on your heels with your spine straight. Raise your arms over your head with your elbows straight and your fingers interlaced except for the index fingers, which are pointed upward. Chant “Sat” on the inhale and “Nam” on the exhale, pulling the navel in and out with each breath. Perform for 3-11 minutes, and finish by holding your breath in for a moment and then exhaling. 5. Kundalini Snake Pose (Cobra Pose) Purpose: To awaken and direct energy up the spine. How to do: Lie down on your stomach, with your palms pressed firmly on the ground under your shoulders. Inhale and slowly lift your head, chest, and upper body up, arching your back into a gentle cobra shape. Look upward and hold for a few breaths, then slowly lower your body back down. Perform for 1-3 minutes. 6. Frog Pose (Bhekasana) Purpose: Opens the hips, stimulates the root chakra, and helps activate Kundalini. How to do: Begin by squatting with your feet flat on the floor and knees wide apart. Place your hands on the floor in front of you. Inhale and jump, bringing your legs behind you and your body into a plank position. Exhale and jump back into a squat, keeping your spine straight and your feet flat. Repeat for 2-3 minutes. 7. Kundalini Shoulder Shrugs Purpose: Awakens and strengthens the Kundalini energy while relieving tension in the upper body. How to do: Sit in a comfortable position with a straight spine. Inhale deeply as you lift both shoulders toward the ears. Exhale fully as you release the shoulders back down, pulling the shoulder blades towards each other. Continue for 2-3 minutes. 8. Sufi Grind Purpose: This movement works with the spine and energy flow, activating the Kundalini Shakti. How to do: Sit with your legs crossed and your hands resting on your knees. Begin gently rotating your torso in a circular motion, moving your shoulders and hips. Gradually increase the movement as you inhale and exhale deeply. Perform in both directions for 2-3 minutes each. 9. Spinal Twist (Ardha Matsyendrasana) Purpose: Enhances spinal flexibility, stimulates energy flow, and opens up the heart chakra. How to do: Sit with your legs extended and your spine straight. Bend your right knee and place the foot on the outside of the left knee. Twist your body to the right, placing your left elbow outside your right knee. Hold the position for 30 seconds to 1 minute, and then repeat on the other side. 10. Meditation for Awakening the Kundalini Purpose: Deep meditation that focuses on awakening the Kundalini Shaktiand rising up the chakras. How to do: Sit in a comfortable position with your spine straight. Close your eyes and focus on the space between your eyebrows (the third eye). Visualize the Kundalini energyas a coiled serpent at the base of your spine. Imagine the energy rising through each of the seven chakras, activating each one as it ascends. Stay in this meditation for 10-20 minutes. Conclusion: These Kundalini Yoga Kriyas are powerful tools for awakening the dormant Kundalini Shakti and allowing it to rise through the chakras, promoting physical vitality, mental clarity, emotional balance, and spiritual awakening. It’s important to approach these practices with respect, patience, and a sense of awareness, as the awakening of Kundalini energy can be a transformative and intense experience. If you are new to Kundalini Yoga, it’s recommended to practice under the guidance of an experienced teacher.
Detox Yoga: Best Asanas & Exercises for Cleansing & Rejuvenation
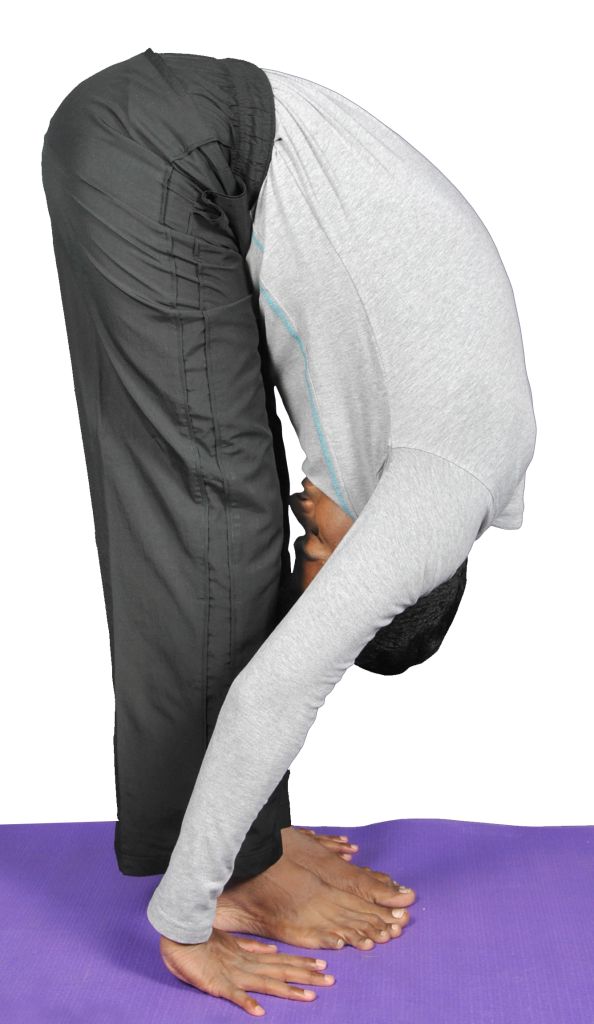
Detox Yoga: Best Asanas & Exercises for Cleansing & Rejuvenation Detoxification is essential for maintaining optimal health, digestion, and mental clarity. While the body naturally detoxifies through the liver, kidneys, lungs, skin, and digestive system, yoga can accelerate the process by stimulating circulation, digestion, and lymphatic flow. This guide covers the best detoxifying yoga poses, breathing exercises, and daily habits to help you cleanse from within. 1. How Yoga Supports Detoxification Yoga enhances detoxification by:✔ Stimulating the digestive system → Improves metabolism & gut health✔ Boosting circulation & lymphatic drainage → Removes toxins faster✔ Activating the liver & kidneys → Filters out impurities✔ Releasing stored tension & emotions → Mental & emotional detox 2. Best Detox Yoga Poses (Asanas) 1️⃣ Twisting Poses – Cleansing the Digestive System Twists massage the internal organs, squeezing out toxins and improving digestion. 🔹 Ardha Matsyendrasana (Half Lord of the Fishes Pose)✔ Stimulates the liver, kidneys & intestines✔ Improves digestion & relieves bloating 🔹 Parivrtta Utkatasana (Revolved Chair Pose)✔ Strengthens the core & detoxifies the abdominal organs 🔹 Supine Spinal Twist (Supta Matsyendrasana)✔ Gently stretches the spine & aids in digestion How to Practice:Hold each twist for 30-60 seconds on both sides. Breathe deeply to enhance detoxification. 2️⃣ Forward Bends – Calming & Internal Cleansing Forward folds stimulate digestion, calm the nervous system, and improve blood flow. 🔹 Paschimottanasana (Seated Forward Bend)✔ Improves gut health & relieves stress 🔹 Uttanasana (Standing Forward Bend)✔ Enhances circulation & helps the body release toxins 🔹 Janu Sirsasana (Head-to-Knee Forward Bend)✔ Stimulates the liver & kidneys for deep cleansing How to Practice:Hold each pose for 30-60 seconds, breathing deeply into your belly. 3️⃣ Inversions – Boosting Circulation & Lymphatic Drainage Inversions help flush toxins by reversing blood flow and boosting the lymphatic system. 🔹 Viparita Karani (Legs-Up-the-Wall Pose)✔ Relieves tired legs & aids circulation 🔹 Sarvangasana (Shoulder Stand) – Advanced✔ Stimulates the thyroid & lymphatic system 🔹 Adho Mukha Svanasana (Downward Dog)✔ Improves blood flow to the brain & lungs How to Practice:Hold for 30 seconds to 2 minutes to allow fluids to drain and refresh the body. 4️⃣ Backbends – Stimulating the Liver & Kidneys Backbends open the front body, stimulate digestion, and energize the system. 🔹 Bhujangasana (Cobra Pose)✔ Opens the chest & stimulates the abdominal organs 🔹 Dhanurasana (Bow Pose)✔ Massages the liver & intestines, aiding digestion 🔹 Setu Bandhasana (Bridge Pose)✔ Supports liver detox & strengthens the spine How to Practice:Hold each pose for 30 seconds, breathing deeply to release tension. 3. Best Breathing Exercises (Pranayama) for Detox 🌀 Kapalabhati (Skull-Shining Breath) ✔ Stimulates digestion & removes carbon dioxide buildup✔ Boosts oxygen flow & energy How to Practice: Sit comfortably, inhale deeply, and exhale forcefully through the nose. Perform 30 rapid exhalations, rest, and repeat 3 rounds. 🌊 Nadi Shodhana (Alternate Nostril Breathing) ✔ Balances energy & clears mental toxins✔ Enhances lung detoxification How to Practice: Close the right nostril, inhale through the left. Close the left nostril, exhale through the right. Repeat 10 roundsfor deep cleansing. 4. Daily Detox Habits to Enhance Yoga Practice ✔ Start Your Day with Warm Lemon Water – Stimulates digestion & flushes toxins✔ Eat Detoxifying Foods – Leafy greens, turmeric, ginger, & fiber-rich foods✔ Dry Brushing – Stimulates lymphatic drainage✔ Hydrate with Herbal Teas – Tulsi, ginger, and dandelion tea support detox✔ Sweat It Out – Exercise or sauna helps release toxins✔ Sleep Well – The body detoxes at night Final Thoughts Detox yoga is a natural way to cleanse your body, mind, and emotions. By incorporating twists, inversions, forward bends, and deep breathing, you’ll boost digestion, circulation, and overall well-being.
10 Best Immune-Boosting Foods to Strengthen Your Immunity
10 Best Immune-Boosting Foods to Strengthen Your Immunity A strong immune system helps protect your body from infections, viruses, and diseases. Eating nutrient-rich foods can naturally enhance your immunity. Here are the top 10 immune-boosting foods: 1. Citrus Fruits (Oranges, Lemons, Grapefruits, Limes) ✔ Rich in: Vitamin C✔ Benefits: Boosts white blood cell production, fights infections, and speeds up recovery. 2. Ginger ✔ Rich in: Antioxidants & Anti-inflammatory properties✔ Benefits: Reduces inflammation, soothes sore throats, and improves digestion. 3. Garlic ✔ Rich in: Allicin (a natural immune booster)✔ Benefits: Fights infections, lowers blood pressure, and supports heart health. 4. Turmeric ✔ Rich in: Curcumin (a powerful anti-inflammatory compound)✔ Benefits: Reduces inflammation, boosts immunity, and improves brain function. 5. Yogurt & Probiotics ✔ Rich in: Probiotics & Vitamin D✔ Benefits: Strengthens gut health, improves digestion, and enhances immune response. 6. Green Leafy Vegetables (Spinach, Kale, Broccoli) ✔ Rich in: Vitamins A, C, E, and Antioxidants✔ Benefits: Helps repair cells, boosts immune function, and provides essential nutrients. 7. Almonds & Nuts ✔ Rich in: Vitamin E & Healthy Fats✔ Benefits: Protects cells from oxidative stress and improves immune function. 8. Green Tea ✔ Rich in: Catechins (powerful antioxidants)✔ Benefits: Fights free radicals, reduces inflammation, and enhances immunity. 9. Mushrooms (Reishi, Shiitake, Maitake) ✔ Rich in: Beta-glucans & Vitamin D✔ Benefits: Supports immune cells, reduces inflammation, and improves gut health. 10. Honey ✔ Rich in: Antioxidants & Natural Antibacterial Properties✔ Benefits: Soothes sore throats, fights infections, and supports digestive health. Bonus Tips to Strengthen Your Immune System: ✔ Stay hydrated – Drink enough water to flush out toxins.✔ Get enough sleep – 7-9 hours of quality sleep boosts immunity.✔ Exercise regularly – Helps circulation and overall health.✔ Manage stress – Meditation, yoga, and breathing exercises help.
Chair Yoga for Seniors and Beginners – A Gentle & Accessible Practice
Chair Yoga for Seniors and Beginners – A Gentle & Accessible Practice Chair yoga is a gentle form of yoga that is performed while sitting on a chair or using a chair for support. It is ideal for seniors, beginners, or anyone with limited mobility, helping improve flexibility, balance, and relaxation without putting strain on the joints. 🌟 Benefits of Chair Yoga ✅ Enhances flexibility & mobility – Keeps joints active and reduces stiffness.✅ Improves posture & balance – Helps prevent falls and promotes better body alignment.✅ Boosts circulation & heart health – Encourages movement and blood flow.✅ Reduces stress & anxiety – Calms the nervous system and promotes relaxation.✅ Supports recovery & rehabilitation – Aids in healing from injuries or surgeries.✅ Accessible to all – Ideal for seniors, office workers, and those with physical limitations. 🪑 6 Simple Chair Yoga Poses for Seniors & Beginners 1️⃣ Seated Mountain Pose (Tadasana) ✔ Sit tall with feet flat on the ground.✔ Relax shoulders and place hands on thighs or in a prayer position.✔ Take deep breaths, focusing on posture and grounding. 🧘 Benefits: Improves posture, breath awareness, and spinal alignment. 2️⃣ Seated Cat-Cow Stretch ✔ Sit on the chair, hands on knees.✔ Inhale – Arch your back, lift your chest, and look up (Cow Pose).✔ Exhale – Round your spine, tuck your chin (Cat Pose).✔ Repeat 5-10 times. 🧘 Benefits: Increases spinal flexibility and relieves back tension. 3️⃣ Seated Side Stretch ✔ Sit tall and place one hand on the chair.✔ Raise the opposite arm overhead and lean gently to the side.✔ Hold for a few breaths and switch sides. 🧘 Benefits: Stretches the spine, ribs, and shoulders, improving flexibility. 4️⃣ Seated Forward Bend ✔ Sit with feet hip-width apart.✔ Inhale, lengthen the spine; exhale, hinge forward from the hips.✔ Rest hands on knees or reach toward feet. 🧘 Benefits: Stretches the back, hamstrings, and shoulders, promoting relaxation. 5️⃣ Seated Spinal Twist ✔ Sit with feet flat and hands on thighs.✔ Inhale, lengthen the spine; exhale, twist to one side, placing one hand on the opposite knee.✔ Hold for a few breaths and switch sides. 🧘 Benefits: Improves spinal mobility, digestion, and circulation. 6️⃣ Seated Ankle-to-Knee Pose (Hip Opener) ✔ Sit with feet on the ground.✔ Place the right ankle over the left knee (like a figure-4).✔ Hold and breathe, then switch sides. 🧘 Benefits: Opens hips, improves circulation, and reduces stiffness. 🌞 Chair Yoga for Daily Well-Being ✔ Morning – Start with deep breathing & gentle stretches.✔ Afternoon – Do spinal twists & forward bends to relieve tension.✔ Evening – Relax with meditation & breath awareness. Chair yoga is a simple yet powerful practice that allows everyone to enjoy the benefits of yoga, regardless of age or mobility. Just a few minutes a day can improve flexibility, balance, and mental clarity.