
Dhyana Mudra (Gesture of Meditation)
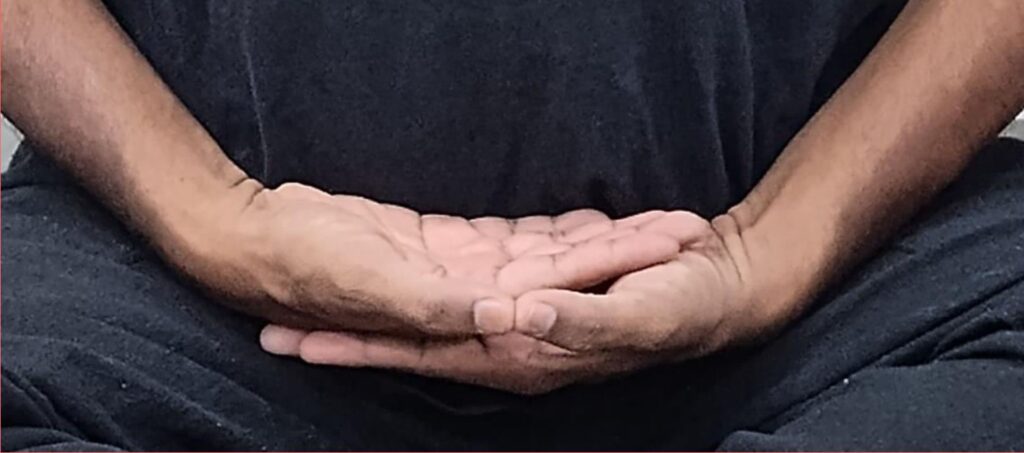
Dhyana Mudra (Gesture of Meditation) Introduction Dhyana Mudra, also called the Meditation Mudra, is a hand gesture commonly used in Buddhist and yogic meditation practices. It symbolizes deep contemplation, mental concentration, and inner calm. This mudra is typically practiced during meditation, pranayama, and mindfulness exercises to help stabilize the mind, enhance focus, and cultivate spiritual awareness. Meaning Etymology: Dhyana means meditation or contemplation in Sanskrit. Mudra means gesture or seal. Symbolism: Represents the balance of thought, mind, and energy. Encourages mental stillness and spiritual awakening. The gesture also symbolizes union of divine consciousness with individual awareness. How to Perform Dhyana Mudra Sit comfortably in a meditation posture (Sukhasana, Padmasana, or Vajrasana) with a straight spine. Place both hands on your lap, palms facing upward. Rest the right hand over the left hand, with the thumb tips lightly touching, forming an oval or triangle shape. Keep shoulders relaxed and elbows close to the body. Close your eyes and focus on slow, deep breathing, bringing attention inward. Maintain this mudra for 10–30 minutes during meditation sessions. Tip: The mudra can be used while chanting, practicing mindfulness, or visualizing a calm energy flow. Benefits Promotes mental calmness, focus, and concentration. Reduces stress, anxiety, and mental fatigue. Supports spiritual growth and deeper meditation. Enhances prana circulation, improving energy balance. Encourages mind-body-soul alignment, cultivating emotional stability. Can improve self-awareness and mindfulness during daily life. Contraindications Avoid if there is hand, wrist, or finger injury. Not suitable if maintaining the hand position causes pain or discomfort. People with severe arthritis may need to adjust finger placement or use a supportive cushion. Anatomy & Physiology Involves phalanges, interphalangeal joints, intrinsic hand muscles, and forearm muscles. Stimulates sensory nerve endings in the thumbs and palms, enhancing cortical activity related to focus. Encourages blood circulation in hands and forearms, indirectly supporting autonomic nervous system balance. Promotes relaxation of the chest, shoulders, and back, supporting deep breathing and energy flow. Kinesiology Isometric contraction of thenar and hypothenar muscles maintains thumb contact. Supports fine motor coordination and proprioception. Engages upper back and shoulder muscles to maintain posture stability during meditation. Promotes mind-body integration and awareness through deliberate finger placement. Neurology Activates median and ulnar nerves in the thumbs and hands. Stimulates somatosensory cortex, improving attention and mental focus. Supports parasympathetic nervous system activation, inducing calm and reducing stress. Visualization and meditation strengthen neural pathways associated with introspection, focus, and consciousness. Duration of Practice Beginners: 5–10 minutes daily. Intermediate/Advanced: 15–30 minutes, once or twice daily. Can be combined with breath-focused meditation or chanting for enhanced effects. Counter Mudra Chin Mudra (Gyana Mudra) can serve as a counter, promoting active awareness and concentration. Alternating Dhyana Mudra with Chin Mudra can balance deep meditation with heightened alertness. Conclusion Dhyana Mudra is a core meditation gesture that promotes mental stillness, emotional balance, and spiritual insight. Regular practice enhances focus, self-awareness, and energy alignment, making it an essential mudra for meditative and mindfulness practices. FAQ Q1: Can Dhyana Mudra reduce anxiety?A1: Yes, it stimulates calming neural pathways and encourages mental stillness, reducing stress. Q2: Can children practice it?A2: Yes, with guidance to maintain comfortable hand placement and posture. Q3: Is visualization necessary?A3: Visualization enhances meditative depth but is optional; simple hand placement and breath awareness are sufficient. Q4: Can it be practiced during pranayama?A4: Yes, it complements deep breathing and mindfulness practices effectively. References Swami Satyananda Saraswati, Mudras for Healing and Transformation, Bihar Yoga Publications, 2012. Dr. Harish Johari, Mudra: The Gateway to Health, Inner Traditions, 1994. B.K.S. Iyengar, Light on Yoga, HarperCollins, 2005. Yoga Journal, Mudras for Meditation and Focus, 2018. Hatha Yoga Pradipika and Buddhist meditation texts on hand gestures and energy flow.
Detoxification Mudra (Vishuddhi Mudra / Cleansing Gesture)
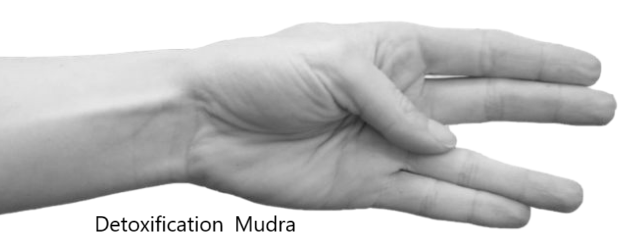
Detoxification Mudra (Vishuddhi Mudra / Cleansing Gesture) Introduction Detoxification Mudra is a yogic hand gesture designed to aid the body in removing toxins, improve metabolism, and promote overall wellness. This mudra is commonly practiced alongside pranayama, meditation, and cleansing routines to support the body’s natural detoxification processes. It stimulates the liver, kidneys, lungs, and lymphatic system, enhancing physical and energetic purification. Meaning Etymology: Detoxification refers to removal of toxins and purification. Mudra means gesture or seal. Symbolism: Represents the cleansing of physical, mental, and emotional toxins. Enhances pranic flow to support health and vitality. Symbolically aligns the body with purity, balance, and energetic clarity. How to Perform Detoxification Mudra Sit comfortably in a meditative posture (Sukhasana, Padmasana, or Vajrasana) with a straight spine. Place tip of thumb touching between ring and middle finger. Close your eyes and focus on slow, deep breathing, imagining toxins leaving the body with each exhale. Maintain this mudra for 10–20 minutes daily for optimal results. Tip: Practicing this mudra in the morning or before meals can enhance metabolic and detoxifying effects. Benefits Supports liver and kidney function, aiding natural detoxification. Enhances digestion and metabolic efficiency. Promotes mental clarity and emotional balance. Reduces stress, fatigue, and sluggishness. Stimulates lymphatic and circulatory systems, aiding toxin removal. Improves prana circulation, enhancing vitality and overall health. Contraindications Avoid if you have finger, hand, or joint injuries. People with arthritis or severe hand deformities should modify the finger position. Not recommended if overexertion or pain occurs during practice. Anatomy & Physiology Involves phalanges, interphalangeal joints, intrinsic hand muscles, and forearm muscles. Stimulates nerve endings in the thumb and middle finger, which correspond to liver and kidney energy in reflexology and acupressure points. Encourages blood circulation in hands and arms, indirectly supporting autonomic nervous system function. Enhances respiratory efficiency through relaxed posture and deep breathing. Kinesiology Isometric contraction of thenar, hypothenar, and interossei muscles maintains the thumb-middle finger contact. Enhances fine motor coordination and proprioception. Supports shoulder and upper back stabilization during meditation. Encourages mind-body integration via conscious finger placement and breath awareness. Neurology Activates median and ulnar nerves, enhancing sensory feedback. Stimulates the somatosensory cortex, improving awareness and focus. Promotes parasympathetic nervous system activation, reducing stress and enhancing detoxification. Visualization during practice strengthens neural pathways associated with cleansing, energy circulation, and self-regulation. Duration of Practice Beginners: 10 minutes daily. Intermediate/Advanced: 15–20 minutes, once or twice daily. Can be combined with pranayama, yoga asanas, or meditation for enhanced detox effects. Counter Mudra Prana Mudra or Gyana Mudra can act as counter mudras to support energy activation and grounding. Alternating between Detoxification Mudra and Prana Mudra enhances both cleansing and energizing effects. Conclusion Detoxification Mudra is a simple yet effective gesture that supports physical and energetic cleansing, improves digestion, enhances prana flow, and promotes mental clarity. Regular practice can boost vitality, emotional balance, and overall health. FAQ Q1: Can Detoxification Mudra replace medical detoxification?A1: No, it complements healthy lifestyle practices like diet, hydration, and exercise. Q2: Can children practice it?A2: Yes, with supervision and gentle guidance on finger placement. Q3: Is visualization necessary?A3: Visualization enhances effects but is optional; focusing on breath and awareness is sufficient. Q4: Can it be combined with pranayama?A4: Yes, it is highly effective when practiced alongside deep breathing or cleansing pranayama like Kapalabhati. References Swami Satyananda Saraswati, Mudras for Healing and Transformation, Bihar Yoga Publications, 2012. Dr. Harish Johari, Mudra: The Gateway to Health, Inner Traditions, 1994. B.K.S. Iyengar, Light on Yoga, HarperCollins, 2005. Yoga Journal, Mudras for Detox and Energy Flow, 2018. Hatha Yoga Pradipika and Ayurvedic texts on prana, digestion, and detoxification.
Dvimukha Mudra

Dvimukha Mudra Introduction Mudras are sacred hand gestures used in yoga, meditation, Ayurveda, and Indian classical dance to channel subtle energy and deepen awareness. Each mudra has symbolic, therapeutic, and spiritual significance. Dvimukha Mudra is one such gesture, found in hasta-mudra traditions of dance (Natya Shastra, Abhinaya Darpana) and yogic symbolism. Dvimukha literally means “two faces” or “two openings”. This mudra signifies duality, dialogue, openness, and receptivity. In yogic practice, it is used to harmonize duality of existence (sun–moon, ida–pingala, inner–outer), and in Indian dance, it represents offerings, gifts, or sacred objects. Meaning Dvi = two Mukha = face, mouth, or opening Dvimukha = Two-faced, dual-aspect, or having two openings Symbolism: The duality of life (light/dark, inner/outer, masculine/feminine). Communication and dialogue, since two “mouths” suggest exchange. Offering and receptivity, as in classical dance usage (offering flowers, fruits, lamps). Balance of ida and pingala nadis, leading to harmony at the central channel (sushumna). How to Perform Dvimukha Mudra (Method of Practice) Sit comfortably in Sukhasana, Padmasana, or Vajrasana with an upright spine. Raise the hands in front of the abdomen, palms facing the midline. Lightly touch the tips of the little and ring fingers of both hands. Relax shoulders and breathe deeply. Close your eyes and focus on the balance between left and right sides of the body. Visualize energy flowing through ida (left, lunar) and pingala (right, solar) nadis, meeting in the heart. Hold for 5–30 minutes in meditation or chanting. Benefits of Dvimukha Mudra Physical Benefits Improves respiratory efficiency by keeping the chest open. Promotes balanced circulation and oxygen flow. Enhances hand coordination and finger strength. Relieves fatigue and mild chest tightness. Mental Benefits Encourages open-mindedness and balanced thinking. Helps resolve inner conflicts by uniting dual aspects. Promotes calmness and emotional balance. Enhances communication skills (metaphorically, two mouths in dialogue). Spiritual Benefits Symbolizes union of dual energies (ida & pingala nadis, yin & yang). Activates the heart chakra (Anahata) by joining both hands at chest level. Encourages awareness of oneness beyond duality. Useful in meditation, puja, and mantra chanting as a gesture of offering. Contraindications Should not be practiced for long durations by those with finger stiffness, arthritis, or nerve pain. Avoid during extreme fatigue or cold conditions, as it may reduce vitality. Not recommended when one is mentally unstable or agitated, since it requires calmness. Anatomy & Physiology Engages flexor and extensor muscles of fingers. Stimulates both sympathetic and parasympathetic balance by aligning left and right hand activity. Opens the chest cavity, supporting respiration and cardiac efficiency. The bilateral gesture promotes neural synchronization across hemispheres. Kinesiology Finger flexion with fingertip contact creates isometric engagement. The symmetrical posture trains neuromuscular coordination. Balances bilateral movement patterns, reflecting left–right equilibrium. Neurology Stimulates sensory–motor cortex regions for all fingers, strengthening brain-hand connection. Engages corpus callosum pathways, improving left–right brain integration. Activates vagal tone, calming stress responses. Supports prefrontal cortex function, aiding focus and higher awareness. Duration of Mudra Beginners: 5–10 minutes. Regular practice: 15–30 minutes. Advanced: Up to 45 minutes (in divided sessions). Best done during meditation, chanting, or before teaching/communication. Counter Mudra To balance Dvimukha Mudra if overstimulating or creating too much openness: Anjali Mudra (prayer gesture) – for centering and devotion. Jnana Mudra – for clarity and focus. Prithvi Mudra – for grounding and stability. Conclusion Dvimukha Mudra is a symbolic gesture of duality, balance, and offering. It represents the union of two aspects of existence and helps harmonize inner and outer worlds. Practiced regularly, it enhances breathing, calms the mind, and supports spiritual receptivity. It is both a yogic and ritual gesture that embodies openness, communication, and equanimity. FAQ Q1. What does Dvimukha Mudra represent?It symbolizes two faces or openings, duality, and communication between opposites. Q2. Is it used in classical dance as well?Yes, in Bharatanatyam and other dances, it represents offering flowers, lamps, or sacred objects. Q3. Which chakra does it activate?Primarily the heart chakra (Anahata). Q4. Can it be practiced during meditation?Yes, it is highly effective in meditation for balancing inner conflicts. Q5. Is it safe for everyone?Yes, generally safe, except for those with severe finger/joint conditions. References Swami Satyananda Saraswati, Asana, Pranayama, Mudra, Bandha (Bihar School of Yoga). Joseph Le Page & Lilian Aboim, Mudras for Healing and Transformation. Rajeswari Raman, Mudras: For Body, Mind and Spirit. Abhinaya Darpana & Natya Shastra (classical dance manuals referencing Dvimukha hasta).
Gada Mudra (Mace Gesture)
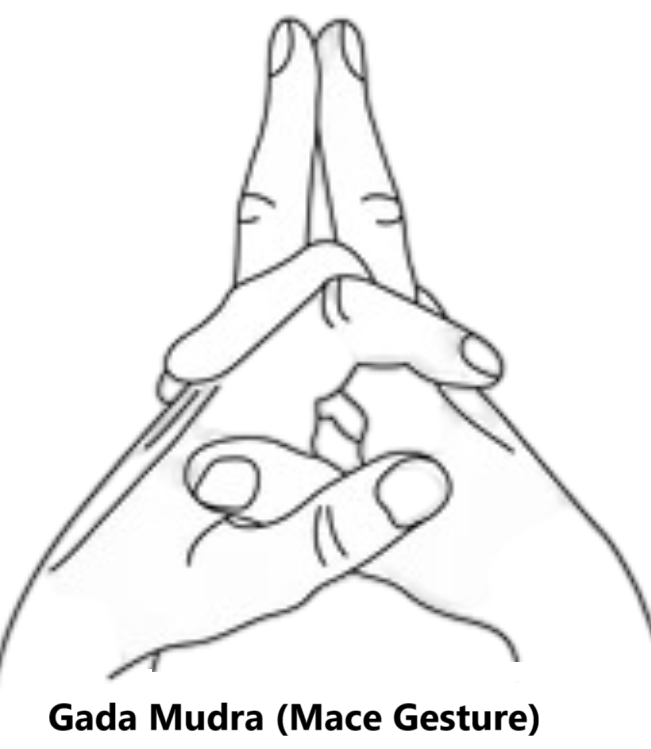
Gada Mudra (Mace Gesture) Introduction Gada Mudra, also known as the Mace Mudra, is a powerful yogic hand gesture that symbolizes strength, stability, and power, inspired by the traditional Indian mace, a symbol of courage and energy. It is often practiced in meditation, pranayama, and mudra therapy to enhance physical vitality, mental resilience, and willpower. Meaning Etymology: Gada means mace in Sanskrit. Mudra means gesture or seal. Symbolism: Represents strength, stability, and grounded energy. Encourages mental courage, physical stamina, and emotional resilience. Symbolically supports inner power and discipline. How to Perform Gada Mudra Sit comfortably in a meditation posture (Sukhasana, Padmasana, or Vajrasana) with a straight spine. Hold the hands in front of you with the palms up. Bend and interlace the little fingers and ring fingers at the second knuckle. Touch the tips of the middle fingers and extend them upward. Form two interlocking rings by touching the tips of the index finders and thumbs on both hands. Maintain this mudra for 10–15 minutes daily for optimal results. Tip: Practicing this mudra in the morning or before physical activity enhances strength and vitality. Benefits Enhances physical strength and stamina. Improves mental courage, resilience, and focus. Supports immune function and energy circulation. Reduces fatigue, lethargy, and mental stress. Strengthens willpower, determination, and self-discipline. Promotes grounding and stability in both mind and body. Contraindications Avoid if there is injury or pain in the fingers, hands, or wrists. Not recommended for people with severe arthritis or joint limitations unless modified. Discontinue practice if discomfort occurs during prolonged use. Anatomy & Physiology Involves phalanges, interphalangeal joints, intrinsic hand muscles, and forearm muscles. Stimulates nerve endings in the thumbs and fingers, enhancing sensory input and cortical activity. Promotes blood circulation in hands, forearms, and upper extremities, indirectly supporting autonomic nervous system function. Encourages postural alignment and breathing efficiency, improving overall energy distribution. Kinesiology Isometric contraction of thenar, hypothenar, and interossei muscles maintains finger interlock. Engages forearm, shoulder, and upper back muscles for stabilization. Enhances fine motor control, proprioception, and hand dexterity. Supports mind-body coordination and intentional energy flow. Neurology Activates median and ulnar nerves, stimulating the somatosensory cortex. Promotes parasympathetic nervous system activation, reducing stress and enhancing focus. Visualization of strength during the mudra strengthens neural pathways associated with confidence, endurance, and mental fortitude. Duration of Practice Beginners: 5–10 minutes daily. Intermediate/Advanced: 10–15 minutes, once or twice daily. Ideal before physical activity, meditation, or energy work. Counter Mudra Prana Mudra can be used as a counter, stimulating vital energy and circulation. Alternating Gada Mudra with Prana Mudra balances strength, energy activation, and vitality. Conclusion Gada Mudra is a powerful gesture for physical and mental strength, stability, and vitality. Regular practice improves endurance, focus, courage, and grounding, making it a valuable addition to meditation, pranayama, and wellness routines. FAQ Q1: Can Gada Mudra improve energy and stamina?A1: Yes, it activates prana circulation and mental focus, enhancing physical and mental vitality. Q2: Can children practice it?A2: Yes, under supervision to ensure proper hand placement and comfort. Q3: Is visualization necessary?A3: Visualization of strength enhances effects, but simple practice with awareness is sufficient. Q4: Can it be combined with meditation or pranayama?A4: Yes, it complements deep breathing, meditation, and energy-focused practices. References Swami Satyananda Saraswati, Mudras for Healing and Transformation, Bihar Yoga Publications, 2012. Dr. Harish Johari, Mudra: The Gateway to Health, Inner Traditions, 1994. B.K.S. Iyengar, Light on Yoga, HarperCollins, 2005. Yoga Journal, Mudras for Energy, Strength, and Focus, 2018. Hatha Yoga Pradipika and Ayurvedic texts on prana, stamina, and energy flow.
Chakra Mudra (Wheel Gesture)
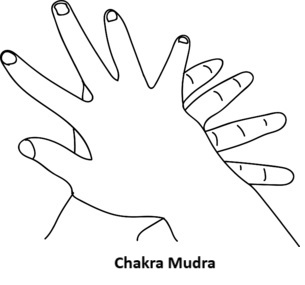
Chakra Mudra (Wheel Gesture) Introduction Chakra Mudra is a yogic hand gesture designed to stimulate energy centers (chakras) and enhance the flow of prana (life force energy) throughout the body. It is often used in meditation, pranayama, and spiritual practices to balance mental, emotional, and physical energies. This mudra helps harmonize energy in all chakras, promoting overall wellness and spiritual growth. Meaning Etymology: Chakra means wheel or energy center in Sanskrit. Mudra means gesture or seal. Symbolism: Represents the cyclical flow of energy in the body. Encourages balance between mind, body, and spirit. Symbolically aligns the seven major chakras along the spine. How to Perform Chakra Mudra Sit in a comfortable meditation posture (Sukhasana, Padmasana, or Vajrasana) with your spine straight. Place the right palm on the left palm in such manner that the index finger of the right hand is placed on the thumb of the left hand and small finger of the right hand is placed on the index finger of the left hand. Now press the palms against each other. Hold the mudra for 5–15 minutes, gradually increasing duration as comfort allows. Tip: Visualization of spinning light in each chakra enhances the mudra’s effects. Benefits Balances energy flow across all chakras. Enhances mental clarity, focus, and emotional stability. Promotes spiritual awareness and meditation depth. Supports autonomic nervous system balance, reducing stress and anxiety. Stimulates blood and pranic circulation, improving vitality. May improve physical energy, immunity, and emotional resilience. Contraindications Avoid if you have hand or wrist injuries. People with severe arthritis may find finger interlocking difficult; modify as needed. Not recommended for recent surgery or acute pain in the upper body. Anatomy & Physiology Involves intrinsic hand muscles, interossei, thenar, and hypothenar muscles. Stimulates sensory nerve endings in the fingertips, activating cortical regions related to focus and energy awareness. Enhances blood flow to the hands, forearms, and upper torso, indirectly supporting central nervous system function. Promotes respiratory and circulatory efficiency through relaxed posture and deep breathing. Kinesiology Isometric contraction of hand and forearm muscles maintains the interlocked posture. Promotes fine motor coordination and proprioception. Encourages shoulder and upper back stabilization during meditation. Supports mind-body integration through controlled finger positioning and conscious breathing. Neurology Activates median, ulnar, and radial nerves. Engages somatosensory cortex, enhancing tactile awareness and concentration. Visualization stimulates neural pathways related to energy perception and meditation focus. May activate parasympathetic nervous system, promoting calmness and stress reduction. Duration of Practice Beginners: 5–10 minutes daily. Intermediate/Advanced: 15–20 minutes, once or twice daily. Can be practiced during meditation, pranayama, or yoga nidra sessions. Counter Mudra Gyana Mudra (Chin Mudra) can be used as a counter, emphasizing intellectual clarity and calmness. Alternating between Chakra Mudra and Gyana Mudra helps balance spiritual energy and mental focus. Conclusion Chakra Mudra is a powerful energetic tool that enhances the flow of prana, harmonizes the chakras, and supports mental, emotional, and spiritual balance. Regular practice strengthens focus, vitality, and self-awareness, making it ideal for meditation and holistic wellness. FAQ Q1: Can Chakra Mudra help with stress?A1: Yes, it stimulates the parasympathetic nervous system and balances energy flow, reducing anxiety. Q2: Can children practice it?A2: Yes, with supervision and gentle guidance for finger positioning. Q3: Is visualization necessary?A3: Visualization enhances benefits but is optional. Awareness of energy flow is sufficient for beginners. Q4: Can it be combined with pranayama?A4: Yes, it synergizes well with deep breathing and meditation practices. References Swami Satyananda Saraswati, Mudras for Healing and Transformation, Bihar Yoga Publications, 2012. Dr. Harish Johari, Mudra: The Gateway to Health, Inner Traditions, 1994. B.K.S. Iyengar, Light on Yoga, HarperCollins, 2005. Yoga Journal, Mudras for Chakra Balance and Energy Flow, 2018. Hatha Yoga Pradipika and Ayurvedic texts on prana, nadis, and chakra energy.
Bronchial Mudra (Gesture for Respiratory Health)
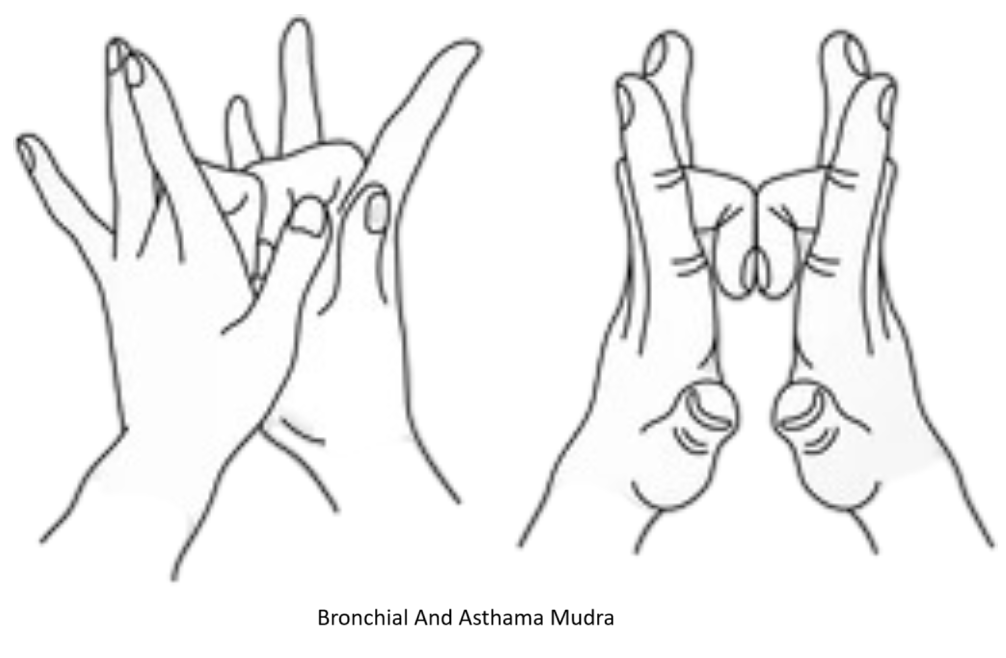
Bronchial Mudra (Gesture for Respiratory Health) Introduction Bronchial Mudra is a therapeutic hand gesture used in yoga and pranayama to support respiratory health. It is particularly effective in strengthening the lungs, easing breathing, and reducing respiratory discomfort. This mudra is recommended for individuals with asthma, bronchitis, or general respiratory weakness. It is part of Ayurvedic and yogic healing practices, where mudras are used to balance elements (Vata, Pitta, Kapha) and optimize physiological function. Meaning Etymology: Bronchial refers to the bronchi, the air passages of the lungs. Mudra means gesture or seal. Symbolism: Represents the opening and cleansing of respiratory pathways. Supports air element (Vayu) balance, improving the flow of prana (life energy) through the lungs. How to Perform Bronchial Mudra Sit comfortably in a meditation posture (Sukhasana, Padmasana, or on a chair). Place the tip of your little finger at the base of your thumb, the tip of your ring finger at the joint of the upper thumb, and the tip of your middle finger at the tip of the thumb. Extend your index finger so that it is straight. Practice this pose with one or both hands for about 5 minutes each day. Follow it with another gesture, where you – Touch the bottom of your palms and bend your middle fingers, in order that they touch one another. Press the fingernails of your middle fingers while extending all your other fingers.Focus on slow, deep breathing, imagining air flowing freely through the bronchial tubes. Maintain this position for 5–15 minutes daily. Tip: Practice this mudra in a calm environment with fresh air for best results. Benefits Improves lung capacity and respiratory efficiency. Helps relieve bronchitis, asthma, and chest congestion. Strengthens diaphragm and intercostal muscles. Promotes relaxation and reduces stress, indirectly aiding breathing. Balances air (Vata) and ether (Akasha) elements, enhancing pranic flow. Supports immune function by enhancing oxygenation and circulation. Contraindications Avoid if there is recent finger or hand injury. People with severe arthritis or hand deformities may need modification. Not a replacement for medical treatment for serious respiratory conditions. Anatomy & Physiology Involves phalanges, interphalangeal joints, and intrinsic hand muscles. Stimulates sensory nerve endings in fingertips, influencing autonomic nervous system. Enhances lung function indirectly by promoting calmness and better diaphragmatic breathing. May improve circulation to the hands, which supports overall oxygenation. Kinesiology Isometric engagement of the thenar, hypothenar, and interossei muscles. Promotes fine motor coordination and proprioception in fingers and hands. Encourages mind-body connection through deliberate finger positioning and focus. Neurology Activates median and ulnar nerves. Engages somatosensory cortex, enhancing awareness and focus on breath. Stimulates parasympathetic nervous system, reducing stress and aiding respiratory function. Visualization of air flow may strengthen neural pathways related to breath control. Duration of Practice Beginners: 5–10 minutes daily. Intermediate/Advanced: 15 minutes, once or twice daily. Can be practiced during meditation, pranayama, or while seated in a calm environment. Counter Mudra Prana Mudra (thumb, ring finger, and little finger together) can be used as a counter to stimulate overall energy and vitality. Alternating with Chin Mudra or Gyana Mudra helps balance mental clarity with respiratory support. Conclusion Bronchial Mudra is a therapeutic gesture for respiratory health, aiding in lung function, stress reduction, and improved breathing. Regular practice enhances energy flow, oxygenation, and overall vitality, especially for those prone to bronchial or respiratory issues. FAQ Q1: Can it help with asthma attacks?A1: It may assist in regular maintenance and calming breath, but acute attacks require medical attention. Q2: Can children practice it?A2: Yes, with guidance for proper finger placement and breathing focus. Q3: Is visualization necessary?A3: Visualization of clean, flowing breath enhances the mudra’s benefits but is optional. Q4: Can it be combined with pranayama?A4: Yes, it complements deep breathing exercises like Anulom Vilom or diaphragmatic breathing. References Swami Satyananda Saraswati, Mudras for Healing and Transformation, Bihar Yoga Publications, 2012. Dr. Harish Johari, Mudra: The Gateway to Health, Inner Traditions, 1994. B.K.S. Iyengar, Light on Yoga, HarperCollins, 2005. Yoga Journal, Mudras for Respiratory Health, 2017. Ayurvedic and yogic texts on Prana and the air element (Vata) regulation.
Bhu Mudrā

Bhu Mudrā Introduction Bhu Mudrā is a yogic hand gesture that symbolizes grounding, stability, and connection with Earth energy. Named after Bhu, meaning “Earth” in Sanskrit, this mudrā is used to stabilize energy, enhance focus, and improve overall vitality. It is often practiced in meditation, pranayama, and yoga therapy to foster a sense of rootedness and inner calm. Meaning Etymology: Bhu = Earth Mudrā = seal, gesture, or symbolic hand position Literal Meaning: “Earth gesture” Symbolism: Represents grounding, stability, patience, and connection with the physical world, helping practitioners feel centered and balanced. How to Perform Practice Sit in a comfortable posture (Padmāsana, Sukhasana, or on a chair) with the spine erect. Let your arms hang straight down from your shoulders toward the ground. Using both hands, fold your ring and little fingers and your thumb into your palm. Keep the middle and index fingers straight so they touch the ground or point toward it, making a relaxed, and inverted ‘V’ shape. Hold for as long as feels comfortable; repeat as required. Close your eyes and focus on rooting energy from the Earth into your body. Maintain steady breathing and visualization for 5–15 minutes daily. Can be combined with pranayama or meditation for enhanced grounding. Benefits Physical Benefits Enhances posture and spinal stability. Improves circulation to lower extremities. Supports muscle relaxation and balance. Mental & Emotional Benefits Reduces anxiety, stress, and restlessness. Improves mental stability, focus, and patience. Promotes emotional balance and inner calm. Spiritual Benefits Stimulates prānic flow through Mūlādhāra (root) chakra. Encourages a sense of grounding and connection with Earth energy. Supports meditation and energy-centered practices. Contraindications Avoid if experiencing severe wrist or hand injuries. Modify practice if circulatory problems or joint pain is present. Maintain gentle posture if lower back issues exist. Anatomy & Physiology Engages intrinsic hand muscles and forearm stabilizers. Activates postural muscles of the spine and core. Enhances blood circulation and lymphatic flow in lower extremities. Supports energy grounding through nerve and subtle energy channels. Kinesiology Involves isometric stabilization of hands and fingers. Promotes neuromuscular awareness and postural alignment. Combines breath, hand placement, and visualization for energetic effect. Neurology Activates parasympathetic nervous system, reducing stress and mental agitation. Stimulates proprioception and body awareness. Enhances focus, patience, and cognitive stability. Duration of Mudrā Beginners: 5–10 minutes daily Intermediate: 10–15 minutes daily Advanced: 15–20 minutes, combined with meditation or pranayama Counter Mudrā Prāna Mudrā – to energize after grounding. Apāna Mudrā – to assist detoxification and energy release. Conclusion Bhu Mudrā is a powerful grounding gesture that enhances physical stability, mental calmness, and spiritual rootedness. It connects practitioners to Earth energy, balances prānic flow, and promotes emotional resilience and focus. Regular practice supports holistic well-being, meditation, and energy balance. FAQ Q1. When is the best time to practice Bhu Mudrā?During meditation, pranayama, or whenever grounding is needed, especially in the morning or evening. Q2. Can it be performed while sitting on a chair?Yes, with spine erect and palms resting on knees. Q3. How long should I hold this mudrā?Start with 5–10 minutes and gradually increase to 15–20 minutes. Q4. What is the main benefit of Bhu Mudrā?It primarily grounds energy, reduces stress, and improves focus and patience. References Swami Satyananda Saraswati – Asana, Pranayama, Mudra, Bandha Joseph & Lilian LePage – Mudras for Healing and Transformation Georg Feuerstein – The Yoga Tradition Swami Niranjanananda Saraswati – Yoga in Daily Life Gertrud Hirschi – Mudras: Yoga in Your Hands
Bhujangini Mudra (Cobra Energy Gesture)
Bhujangini Mudra (Cobra Energy Gesture) Introduction Bhujangini Mudra is a hand gesture inspired by the Cobra (Bhujanga) and is primarily used in yoga and meditation to activate energy, awaken Kundalini, and stimulate vitality. It is often associated with enhancing prana (life force energy) and improving spinal and digestive health. This mudra is less commonly known than Jnana or Chin Mudra but is valued in Tantric and Hatha Yoga practices for its energetic benefits. Meaning Etymology: Bhujangini derives from Bhujanga, meaning serpent or cobra in Sanskrit. Symbolism: Represents kundalini energy rising through the spine like a cobra. Stimulates agni (digestive fire) and awakens latent energy for physical and mental vitality. How to Perform Bhujangini Mudra Sit in a comfortable meditation posture (Sukhasana or Padmasana) with your spine erect. Sit in any comfortable meditation asana. Close the eyes and relax the whole body, especially the abdomen. Push the chin forward and a little upward. Suck in air through the mouth and draw it into the stomach, not the lungs, in a series of gulps as though drinking water. Expand the stomach as much as possible. Hold the air inside for as long as comfortable, then expel the air by belching. Benefits Energy & Vitality: Awakens and circulates Kundalini energy. Spinal Health: Stimulates spinal flexibility and circulation. Digestive Support: Activates digestive fire (Agni) improving metabolism. Mental Clarity: Enhances concentration, focus, and cognitive function. Stress Reduction: Balances the nervous system and reduces tension. Hormonal Balance: Supports endocrine system function indirectly via energy activation. Contraindications Avoid if you have severe spinal or back injuries. People with recent abdominal surgery or hernia should refrain. Not recommended during pregnancy without guidance. Those with cardiac conditions should consult a professional before extended practice. Anatomy & Physiology Involves intrinsic muscles of the hand, forearm flexors, and extensor muscles. Activates blood flow to the hands and fingers, stimulating sensory nerve endings. May influence spinal muscles indirectly through mental focus and visualization of energy movement. Enhances autonomic nervous system balance, particularly stimulating parasympathetic relaxation responses. Kinesiology Movement is primarily isometric with minor finger flexion. Engages thenar, hypothenar, and interossei muscles for maintaining hand posture. Supports neuromuscular coordination between fingers and forearm muscles. Encourages fine motor control and proprioceptive awareness. Neurology Stimulates ulnar, median, and radial nerves through finger contact and tension. Activates somatosensory cortex, aiding focus and awareness. Visualization aspect enhances neural pathways linked to energy perception and mind-body integration. Duration of Practice Beginners: 5 minutes per session. Intermediate/Advanced: 10–15 minutes, once or twice daily. Can be performed during meditation or pranayama practice. Counter Mudra A common counter is Gyana (Chin) Mudra, which emphasizes intellectual clarity rather than energy awakening. Switching between Bhujangini and Gyana Mudra balances vital energy and mental focus. Conclusion Bhujangini Mudra is a powerful energizing mudra that supports physical vitality, mental clarity, and spiritual growth. Through regular practice, it promotes spinal health, digestive efficiency, and overall energy balance. It is best integrated into meditation or pranayama sessions for optimal benefits. FAQ Q1: Can Bhujangini Mudra help with fatigue?A1: Yes, it stimulates energy flow and can help reduce both mental and physical fatigue. Q2: Is visualization necessary?A2: Visualization of energy moving like a cobra enhances the benefits but is optional for beginners. Q3: Can it be practiced during pranayama?A3: Yes, it synergizes well with deep breathing techniques. Q4: Is it safe for children?A4: Generally safe, but supervision is recommended for proper finger posture. References Swami Satyananda Saraswati, Mudras for Healing and Transformation, Bihar Yoga Publications, 2012. Dr. Harish Johari, Mudra: The Gateway to Health, Inner Traditions, 1994. B.K.S. Iyengar, Light on Yoga, HarperCollins, 2005. Yoga Journal, Mudras for Energy and Vitality, 2017. Ayurvedic and Tantric texts on Prana and energy flow, Charaka Samhita & Hatha Yoga Pradipika.
Bam Mudra
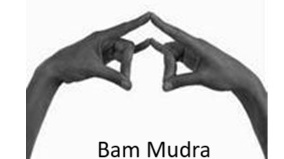
Bam Mudra Introduction Mudras are subtle yogic gestures that influence the flow of prana (life force) and consciousness. They work through the body–mind–energy connection, affecting not only the physical system but also the mental and spiritual dimensions. Among the many mudras used in yogic practices, Bam Mudra holds special importance in mantra and tantric traditions, especially in the worship of Lord Shiva and Devi. This mudra is often performed along with the chanting of the Bija mantra “Bam”, which is associated with the Manipura (solar plexus) chakra or in some tantric texts, connected with creation, energy awakening, and inner fire. Meaning The word “Bam” is a Bija (seed) mantra in tantric and yogic systems. It symbolizes activation of inner energy, fire element, and purification. When expressed as a mudra (hand gesture), Bam Mudra channels the vibrational energy of the mantra into the physical and subtle body. Spiritually, it is believed to awaken divine energy (Shakti) and direct it upward through the chakras. How to Perform Bam Mudra (Method of Practice) Sit in a comfortable meditative posture (Padmasana, Siddhasana, or Vajrasana). Keep the spine erect and shoulders relaxed. Join the tips of the middle and ring fingers together with the pad of the thumb (both hands are identical). Lightly touch the tips of the index and little fingers, and hold the mudra in front of the throat. Close your eyes and bring awareness to your breath. Maintain the mudra for 10–30 minutes daily. Benefits of Bam Mudra Physical Benefits Improves digestion and metabolism by stimulating the Manipura chakra. Balances body heat and energy levels. Enhances immunity and detoxification. May reduce lethargy and fatigue. Mental Benefits Enhances focus, clarity, and willpower. Helps in overcoming fear, insecurity, and low self-esteem. Induces a state of inner strength and confidence. Spiritual Benefits Awakens kundalini energy gradually. Strengthens the practice of mantra sadhana. Balances solar energy within the body. Contraindications Should be avoided in fever, high blood pressure, or excessive body heat conditions. People with ulcers, acidity, or hyperacidity should use caution. Pregnant women should consult a teacher before practicing regularly. Avoid long-duration practice in hot weather. Anatomy & Physiology Musculoskeletal system: Involves flexion of the thumb joint and extension of the other fingers, which subtly engages the forearm flexors/extensors and intrinsic hand muscles. Circulatory & Digestive system: The gesture redirects pranic energy toward the solar plexus, influencing digestive organs like stomach, pancreas, and liver. Respiratory system: Breath awareness with Bam Mudra helps deepen diaphragmatic breathing. Kinesiology Thumb flexion (activating volar muscles) directs pranic force inward. Extension of other fingers balances tension and release in the hand. This biomechanical positioning symbolically and physiologically stimulates manipura chakra energy flow. Neurology Hand mudras stimulate specific areas of the sensory-motor cortex in the brain. The thumb–little finger connection influences the vagus nerve and parasympathetic system, aiding relaxation while simultaneously boosting energy. Chanting the bija mantra “Bam” activates the brain’s auditory and limbic centers, enhancing concentration and emotional regulation. Duration of Mudra Beginners: Start with 5–10 minutes. Regular practitioners: 20–30 minutes daily. Can be done in two or three sittings of 10–15 minutes each. For therapeutic purposes, it can be practiced up to 45 minutes (in divided sessions). Counter Mudra If there is excess heat or overstimulation from Bam Mudra, it can be balanced with: Varun Mudra (water element mudra) – for cooling and hydration. Prana Mudra – to balance life-force energy. Apana Mudra – for grounding and relaxation. Conclusion Bam Mudra is a powerful hand gesture that unites the mantra vibration of “Bam” with the yogic science of mudras. It is especially useful for awakening inner fire, stimulating digestion, and boosting confidence. Practiced with mindfulness and mantra chanting, it not only benefits the body and mind but also prepares the practitioner for deeper spiritual awakening and sadhana. FAQ Q1. Can I practice Bam Mudra without chanting the mantra?Yes, the hand gesture alone has therapeutic effects, but mantra chanting amplifies the benefits. Q2. What is the best time to practice Bam Mudra?Morning or early evening, preferably on an empty stomach. Q3. Can Bam Mudra be combined with meditation?Yes, it enhances concentration and can be combined with breath awareness or mantra meditation. Q4. Is Bam Mudra suitable for children?Yes, but for shorter durations (5–10 minutes) under guidance. Q5. Which chakra does Bam Mudra activate?Primarily the Manipura chakra (Solar plexus). References Swami Satyananda Saraswati, Asana Pranayama Mudra Bandha, Bihar School of Yoga. Rajeswari Raman, Mudras for Healing and Transformation. Gnanananda, Tantric Mudras and Mantras. Joseph Le Page & Lilian Aboim, Mudras for Healing and Transformation.
Bhairava Mudrā
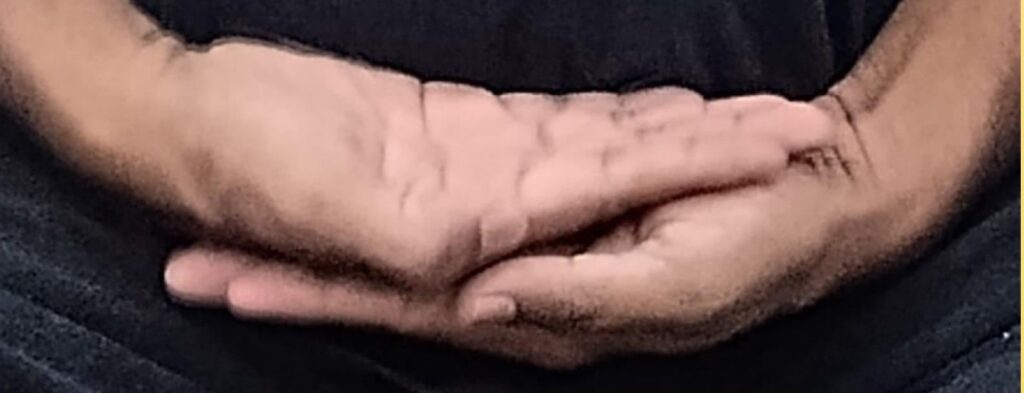
Bhairava Mudrā Introduction Bhairava Mudrā is a powerful yogic and tantric hand gesture used to stimulate courage, willpower, and transformation. Named after Bhairava, the fierce aspect of Lord Shiva, this mudrā is associated with overcoming fear, breaking energy blockages, and activating inner strength. It is practiced in meditation, pranayama, and spiritual rituals to cultivate mental fortitude, clarity, and grounded energy, particularly for dealing with emotional challenges or fear-based limitations. Meaning Etymology: Bhairava = a fierce and protective manifestation of Shiva. Mudrā = seal, gesture, or symbolic hand position. Literal Meaning: “The gesture that invokes the fierce, protective energy of Bhairava.” Symbolism: Represents courage, fearlessness, purification, and transformation, encouraging practitioners to face fears and release internal blockages. How to Perform Practice Sit in a comfortable meditative posture (Padmāsana, Sukhasana, or Vajrāsana) with an upright spine. Place your hands in your lap– on a small cushion if it feels more comfortable. Rest your right hand on top of your left, with both palms facing upward. Allow your joined hands to rest in your lap. Hold for as long as feels comfortable and repeat as required. As a variation, repeat with the left hand on top, which accentuates the fierce feminine energy of the mudra and is known as Bhairavi Mudra. Maintain the mudrā for 5–15 minutes, ideally during meditation or before challenging tasks. Can be combined with pranayama or mantra chanting invoking protective or transformative energies. Note: Finger placement may vary; some traditions emphasize specific locks to stimulate energy in the spine and nervous system. Benefits Physical Benefits Improves posture and spinal alignment during meditation. Enhances circulation to hands, arms, and upper body. Supports muscle relaxation and joint flexibility in the upper limbs. Mental & Emotional Benefits Reduces fear, anxiety, and stress. Strengthens mental clarity, willpower, and focus. Promotes emotional resilience and courage. Spiritual Benefits Stimulates prānic flow and energy activation in the subtle body. Encourages self-transformation and inner purification. Supports meditation and fear-confrontation practices, enabling personal growth. Contraindications Avoid prolonged practice if experiencing wrist, hand, or shoulder injuries. Practice gently if suffering from high blood pressure or cardiovascular issues, as the mudrā may stimulate nervous system activity. Consult a healthcare professional for severe mental health conditions before intensive practice. Anatomy & Physiology Engages intrinsic hand muscles, forearm flexors, deltoids, and spinal stabilizers. Enhances blood and lymph circulation in the upper limbs. Supports spinal alignment and posture. May stimulate subtle energy points (marma or acupressure points) along fingers and hands. Kinesiology Involves isometric contraction and stabilization of the hands and fingers. Encourages neuromuscular awareness of posture and hand positioning. Integrates breath, hand placement, and spinal alignment for therapeutic effects. Neurology Activates nerve endings in the hands, influencing autonomic nervous system balance. Enhances prefrontal cortex function, improving focus and decision-making. Supports limbic system regulation, reducing fear and emotional reactivity. Duration of Mudrā Beginners: 5–10 minutes daily. Intermediate: 10–15 minutes daily. Advanced: 15–20 minutes, combined with pranayama or meditation. Counter Mudrā Jnana Mudrā – to complement Bhairava Mudrā with clarity and wisdom. Prāna Mudrā – to energize after activating courage and protective energy. Conclusion Bhairava Mudrā is a powerful gesture for fearlessness, inner strength, and transformation. Physically, it supports posture and upper body circulation; mentally, it fosters courage, focus, and resilience; spiritually, it activates prānic flow and transformative energy. Regular practice helps cultivate emotional stability, mental clarity, and fearless presence, making it valuable in meditation, therapy, and spiritual practice. FAQ Q1. When should Bhairava Mudrā be practiced?During meditation, pranayama, or before challenging tasks to cultivate courage and focus. Q2. Can it be combined with other mudrās?Yes, it complements Jnana Mudrā or Prāna Mudrā for clarity, energy, and protection. Q3. Is it safe for beginners?Yes, with mindful attention to hand and finger placement, and avoiding strain. Q4. How does it benefit mental health?It reduces fear, stress, and anxiety, while enhancing focus, willpower, and emotional resilience. References Swami Satyananda Saraswati – Asana, Pranayama, Mudra, Bandha Joseph & Lilian LePage – Mudras for Healing and Transformation Georg Feuerstein – The Yoga Tradition Swami Niranjanananda Saraswati – Yoga in Daily Life Gertrud Hirschi – Mudras: Yoga in Your Hands